8.30.2013

[completed] successes and failures

So last week I posted about making diy deodorizing disks and bath fizzies. I am here to report back on those projects.

The disks failed. Twice. The first time they crumbled out of my silicone ice cube molds I thought "perhaps I didn't use enough water" so I tried again. No luck the second time either. So I have abandoned that project. Sometimes Internet tutorials just don't work out.

The bath fizzies, however, did just fine. They were more fun to make also because you get to use your hands to mix the ingredients and it felt nice. I've used one of the fizzies so far and it fizzes nicely, scented the bath nicely, and dissolved away nicely. I might acquire some cuter silicone molds and make some fizzies as gifts. I really want some more essential oils so I have different scents (particularly lavender) to experiment with.

So sometimes things work out and sometimes they don't.

8.24.2013

[wip] diy bath fizzies


With my newfound essential orange oil (of which I appear to have a lot), I decided to tackle a project I've been eyeing for literally years: the diy bath fizzy or bath bomb. Since I had a lot of the materials on hand (baking soda, epsom salts, essential oil) I figured why not? So I picked up some citric acid and witch hazel (and a little spray bottle for the witch hazel), and some silicone molds. Well, that part was tricky. I couldn't find any cute silicone molds, but for $2 for six, these cupcake molds seemed like they'd do the trick. The giant heart mold was also $2, and I bought it because a) I thought I might have extra bath fizzie mixture left over, and b) it was so cute. I love hearts.

Anyway. I followed these Design Sponge directions. There are approximately a million tutorials and sets of instructions out there, but I chose this set because it was simple and didn't involve a ton of difficult-to-acquire materials.


Mixing and molding the bath fizzies was very similar to making the diy deodorizing disks I tackled earlier today. Except that for the bath fizzies, you get to mix using your hands. Which was a great sensory experience, but might have permanently perfumed my hands with the scent of orange. I suppose it could be worse.


Like the deodorizing disks, the bath fizzies have to dry overnight. Now I have a whole collection of things drying! Tomorrow will be an exciting day.

[wip] diy deodorizing disks

supplies
 Today I decided to try a simple, inexpensive and potentially useful craft: diy deodorizing disks. I followed this tutorial by One Good Thing By Jillee. It was very easy - just the supplies seen above (the orange hot pad represents for the boiled water) - baking soda, essential oil (I used orange), mixing bowls and measuring cups, and a silicone ice cube tray or muffin tin (I used an ice cube tray from IKEA). It's not a very scientific process - "add water until you have a thick paste", so I'm crossing my fingers that these disks will be successful.

It ended up making quite a lot - I need to grab two more silicone ice cube trays, as you can see below. So now I will have starfish, stars, and long tube thingies as my "disks". Because I used ice cube trays, each disk is pretty small. I also added way too much orange by accident. They do smell nice and orange-y now, though! I have to let them harden for at least 24 hours, so we'll see in a day or so how well they turned out. I'm hopeful, though - I'd like to have something nice-smelling to put in the closet with the towels, in my dresser drawers, in the bottom of the trash can, etc.

And the best part is that you can supposedly throw them in the wash with your laundry when they stop being effective.

semi-finished product

8.18.2013

[wip] one block down... 15 to go

completed 20x20" block
This is my first completed block for my sister's white quilt. I'm loving how this block turned out. The white-on-white fabrics stand out from each other, and the cream background fabric (Kona Bone) allows the white fabrics to pop. I chose Kona Bone rather than Kona White or Snow because I wanted to ensure that the white piecing (and all the work I did!) is discernible from the background fabric.

I completed this block yesterday, and then prepped a few others. It seems to be faster to do a bit of an assembly-line type production rather than see each block through from start to finish. 

The block turned out smaller than the pattern says it should - oops? I'm not sure how that happened, because the block is evenly 20x20", but as long as my blocks are all consistent, it shouldn't really matter.

I'm super excited about this project. I think it is turning out to be a lovely low-volume quilt, which is all the rage right now. 

Once again, I'm using Cluck Cluck Sew's Wallflowers pattern.

[life] sewing room as it really is

Recently I showed you where I sew. Now I'm going to show you where I sew while I'm actually sewing.


It's a bit messier, as you can see. I have a pile of partly-used fat quarters on the floor (because where else can I store fabric flat?). My laptop is set up on the color-wheel dresser so I can "watch" (aka, just listen to) movies while I sew. The pieces of my current project are all set up nicely within reach. My cutting board is also set up on the desk so I can easily sew and cut without needing to leave the room.


My ironing board is also set up so that I can press quickly - the iron is almost always on while I'm in the midst of a project. You can see my faithful (ha. ha.) companion Sassalass under the ironing board. (She's almost never present when I sew, preferring to wait until I finish a project and then lay all over it. Gandalf, on the other hand, is fascinated by the process and tries to live inside the Enterprise's throat and bat at the needle). You can also see the pink scrap basket ready to store any scraps I acquire while sewing and cutting. On the wall, hanging from my curtain rod, is a completed block for my current project so I have inspiration/proof of progress on the wall.


Here you can see where things get messy. There is (another) scrap basket overflowing next to the black dresser, and a pile of recently purchased fabric waiting to be folded and put away under the window. The top of the black dresser is covered in random things. It's just so easy to put things there...


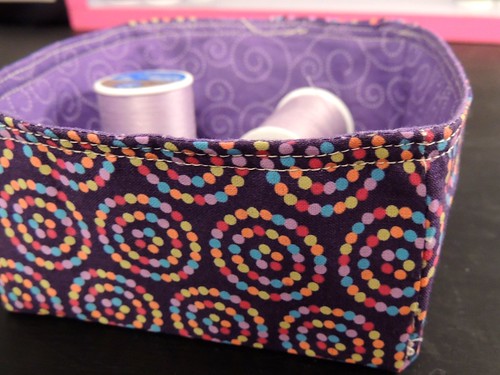
And, of course, Enterprise is all set up and ready to go. The thread catchall that I made last night sits next to Enterprise so that I can easily put snipped threads in there and (hopefully) avoid getting bits of thread all over the room (and myself). And, you might notice, the thread ripper is front and center, ready for use. I hate ripping out stitches, and unfortunately, I have to do it more than I'd like. Hence the easily-accessed thread ripper. (I used to have a prettier, ergonomic one, but Sassy chewed it up, so I just have this basic blue one now).

And that's what my sewing room normally looks like! This is where the sewing magic happens.

8.17.2013

[completed] thread catchall

Untitled by craftthepainaway


I just completed a mini thread basket/bin/catchall! I followed a tutorial by The Sometimes Crafter. For this catchall I shrank the proportions a bit - I made the starting block 10x10" (rather than 15x15)" and cut out 2.5"corner squares rather than the suggested 4.5". (I actually made another basket following the exact instructions, but it turned out bigger (and not as well constructed) than I wanted.

This basket will be used to collect all those random bits of thread that always seem to magically appear during a sewing project. (Even though Enterprise has a marvelous thread cutting feature, little scraps of thread seem to be everywhere in my life).

[wip] it's a white christmas

cutting board, zebra rotary cutter, and scraps

My current work-in-progress is a request from my big sister. She asked for a queen size white quilt for this Christmas. I've started it already because Christmas is notorious for sneaking up on me, and I plan to give quite a few handmade presents again this year.

So I've been cutting yards and yards of fabric on my fabulous new island, and today I've been stitching, cutting, pressing, and stitching some more while watching reruns of The Great Food Truck Race.

This is going to be a long project - each quilt block contains about a bazillion pieces, and is a multi-step process. I'm following Cluck Cluck Sew's fabulous Wallflowers quilt pattern. My version of the quilt will be a lot quieter, with very subtle differences between each fabric. But I think it will be beautiful! I can't wait to see it come together.

Although I am so not excited to quilt another queen-sized beast!

can you tell this is scraps from 16 different fabrics?

[life] gandalf's love for fabric

adorable sleeping kitten... on my WIP

Gandalf in two places he shouldn't be - on the table and on my scraps

8.11.2013

[completed] diy kitchen island

DIY island
Today, Adam and I (and a few friends) finally finished our DIY kitchen island! I put the final touches on the paint this morning, and then just now we (and the friends) put the huge piece of granite onto the island body. We definitely needed the extra assistance to move and maneuver the heavy heavy granite.


The process was (fairly) simple. We bought a unfinished sink base cabinet, attached caster wheels to the bottom of the cabinet (which involved adding some wood to the bottom of the cabinet to attach the wheels to), put unfinished end panels on the sides and the back, attached a toe kick to the front bottom of the cabinet, put corner molding around the back and front bottom corner to hide the edges of the end panels and toekick, primed and painted the island three different colors (chalkboard black for the back, Valspar Mountain Smoke for the sides and front, and Valspar Wet Pavement for the drawers and door fronts).

chalkboard back
The granite was purchased from a local rock shop, after looking at multiple granite shops (and getting $800-900 estimates) and the local Habitat for Humanity ReStore (which had $20 granite remnants but no pieces big enough). At the local rock shop, we got a finished piece (64"x34") with demi-bullnose edges for exactly $300. It was so-o worth it - it looks about a million times better than laminate would have, and was not that much more expensive. Our piece came from a remnant. I wanted a lighter piece of granite, since the kitchen is already covered in black, and I liked that this tan-gold piece had flecks of black and grey in it. Also I loved the giant stripe that runs through this piece.

striped granite
Grand total: Less than $600 for a giant custom DIY kitchen island.

Compare that to the $1000+ premade, less than ideal, assembly-required islands, and I think we did pretty well. Plus it was fun to have a project to work on with Adam!

More pictures to come!

8.10.2013

[100 day city sampler quilt challenge] day twenty, block nine

block nine
I actually finished this block two days ago. Turns out I'm not very good at updating my blog sometimes.

This block was quick and fun to assemble, and a great way to show off fabrics.

8.08.2013

[life] where I sew

Today I thought I would share some photos of my relatively recently painted and decorated sewing room! It's not a terribly large room, but it features two big windows and enough room for my 6 foot long desk, my colorwheel dresser, my thread holder, a bookcase, a black dresser I bought for a mere $80, my new extra-large ironing board (thanks to my mother!) and more lamps than any room could possibly really need.

See?

view from the doorway
I set my desk against the window so I could look out while sewing, and have natural light illuminate my sewing machine.

my awesome desk and my dear Enterprise
I recently discovered (thanks to Adam) that most of my 24x36" cutting board fits on my desk. That means I can cut small pieces of fabric, iron, and sew all in the same room! I hung the Sassy silhouettes on either side of the window. ('m going to need to make some of Gandalf. Although he is not so fluffy, so the silhouettes will likely be uninteresting.)

ironing board and quilt display
Recently, Adam helped me to install a 84" curtain rod on the wall, which allows me to hang quilt for photographing and display purposes. The ironing board was a housewarming gift from my mother, and I love it! The fabulous green iron was a present from Adam. The fabrics on the ironing board all belong to my 100 days city sampler quilt challenge. The little pink fabric box holds scraps, and my awesome yellow mesh trash can holds, well, trash.

curtain rod + clips = quilt display
Adam suggested I hang his anniversary quilt because (and I quote) "I like it". Well good! I like it too! 
The clips are actually designed to hold curtains, but they work well for holding quilts as well.

my colorwheel dresser, thread organizer, and artwork
The bookcase (which I've had for approximately forever!) holds my quilting and sewing books and magazines, with photos of my family and a big silver "E". The colorwheel dresser holds (almost) all my fabric, and my wonky-but-awesome thread holder obviously holds all my thread. The artwork on the walls is a combination of photographs of me and Adam, completed cross-stitch projects, Etsy art, a quote an old au pair wrote out, a Swedish quote about life that my mother game me, and a embroidered skeleton on shirt that my dear friend Erin stitched for me years ago and I recently stretched over a canvas for display.

closet, my burlap lampshade, and the door
The closet holds lots of excess fabric, supplies, and works-in-progress. The black dresser holds general craft supplies. My burlap lamp sits next to the "wish" sign and silver fairy statue from my wedding, and the artwork on the wall are photographs from my wedding with a poem my mother wrote about my wedding veil. And then, of course, there is the door. (One day I will paint all the doors white...)

And that's my sewing room! I love it.

[100 day city sampler quilt challenge] day eighteen, block eight

block eight
This block was a doozy. I actually completed it last night, but I started it days ago. I unstitched quite a few seams before this was completed. It doesn't look that hard, but somehow my points weren't matching up nicely and then I placed a piece wrong, etc etc. Adam chose the fabrics for this one.
Onward!

8.07.2013

[completed] mother-in-law improv quilt wallhanging

my first improv quilt
This gift was actually completed back in May, for a June birthday, but was delivered in August. Oops.
This quilt wallhanging was made for my lovely mother-in-law. She had a bunch of my brother-in-law's artwork from school printed onto fabric, and I turned these amazing prints into a quilt!
I decided to do a modern improv quilt because the artwork was so abstract. I arranged the prints on my floor, and cut random strips of coordinating solids. I stitched and trimmed and stitched and rearranged and trimmed and stitched until I achieved the look I wanted. Adam was a big help during this process - which was great! He even helped pick out the solids I used (all from my stash!).

The back of the quilt features one print that didn't quite make it onto the quilt front, and black, blue and red solids. You can see the quilting pretty clearly on the back - I did a few stitched squares around each print. Since this is a wallhanging, the quilting didn't need to be dense.

back of the quilt

I finished the quilt off with black binding (Adam's idea) and stitched a hanging sleeve on the back of the quilt (not pictured).

In the end I think the quilt came out pretty much how I had hoped. It was just received, and my mother-in-law said she loves it! I'm so glad. This quilt was out of my comfort zone, but I think it was a good stretch for me.

8.04.2013

giant mistake

see the mistake?
Over the past few weeks, I've been working on a quilt for Adam's cousin's daughter's second birthday. Today I finished piecing the last row, ironed it, and starting trimming... and then realized I'd made a giant, irreparable mistake.
Oops.
I guess little Kinley won't be getting a quilt on-time for her birthday. I plan to remake this chevron quilt and donate this not-so-perfect version.
Sigh.
And just look how nicely all my points matched up...

[life] loving Gandalf

me and the tiny kitten
adam and "his" cat


[100 day city sampler quilt challenge] day fourteen, block seven

block seven
Clearly I have fallen behind. But I've been working on other crafty projects, which will be revealed soon, so I don't feel too bad about it.
Block seven was actually completed a few days ago. Adam chose the fabrics. I didn't follow the instructions in the book - at the suggestion of another blogger, I strip-pieced and then cut the checkboard pieces rather than sewing all the tiny squares together. This block was pretty easy to put together, and I am very pleased with how nicely all my points match up!