Showing posts with label present. Show all posts

10.17.2013

[completed] burlap lamp housewarming gift


Remember this burlap that I hand-dyed a long time ago? I finally used it - somehow all my work-in-progress projects are getting attention now. I used the yards and yards of dyed burlap to make another burlap lampshade. This time, I made one for my younger sister and her husband as a housewarming gift (they are moving in November).

I did dye this burlap especially for them and for this project. She had requested a lampshade in a peachy orange color. Hopefully this won't disappoint! 


And of course, what good would a lampshade be without a coordinating lamp base? I found a hideous brass lamp at Goodwill awhile back, and after scuffing it up a bit with a block of sandpaper, I spray-painted it a metallic cappucino color. (It's gorgeous in person). 


Even Gandalf the Cat likes the result!


9.23.2013

[completed] scented sachets, take two


Remember these scented sachets? Well, today I made more! This time, I made them for a care package, for my sister. I used brightly colored felt in fushia, two shades of green and royal blue, and stuffed each sachet with rose-scented potpourri.


ready to be sewn up
I made a total of six sachets, which took me about the length of one (1) Twilight movie. Each sachet has machine-stitched petals and is backed with a cotton print from my stash. One of the sachets was machine-stitched around the edges, but the rest I hand-stitched with either a whipstitch or a blanket stitch. I actually kind of enjoyed the hand-stitching part of the process, which is unusual for me.

pretty scraps
 These will be in a care package with some other goodies, and will hopefully will be well-used!

9.03.2013

[completed] embroidered pillow cover


pillow cover!
An embarrassingly long time ago, my younger sister embroidered a semi-original (she stole a little from Shakespeare) poem for our mother. 

my sister's hand-embroidered poem
She used our mother's favorite colors for her bedroom - dark red, light blue, and cream - and sent me the fabric to make a pillow cover. Today, I finished that pillow cover!

hidden zipper closure
I decided to try my hand at a zipper closure. I followed this Design Sponge tutorial (although there are others like it on the world wide web). I had to rip out quite a few stitches because I didn't thoroughly read the entire set of instructions before beginning. Let that be a lesson to you!

I am pretty pleased with the end result. The zipper works and everything.

the back
For the back, I used a subtle dark red polka-dot print, since there was not enough of the blue fabric to make the backing. I like the contrast of the backing against the pale blue of the front fabric.

I cut my fabric 19x19" but I found that to make a loose pillow cover for this 18x18" pillow form, even with a 1/2" seam allowance, so I stitched closer seams to give the pillow cover a closer fit. (This was a good lesson to learn, as I intend to make more pillow covers for my kitchen seat cushions).

kitten approved
This project has the Gandalf seal of approval.

[completed] tea cozy

teapot cozy and pad
For my mother's birthday, my younger sister and I decided to collaborate on a project. She had requested a new teapot and a tea cozy. So I suggested that my sister handpaint a teapot at a local (to her) paint pottery place. Which she did. She was kind enough to measure the teapot for me so that I would be able to make a snug tea cozy. Since she lives so far away, I never got to get my hands on the teapot personally.


I decided I wanted to use tea-themed fabric that would go (or at least not clash) with the color scheme in my mother's kitchen (which is yellow and green). I found this fabulous tea bag fabric on etsy, and promptly snatched up a half-yard. Which then sat in my colorwheel dresser for ages.


I finally sewed up the tea cozy and teapot pad a few weeks ago and mailed them both off. It only took about an hour to whip up both pieces. I followed the directions from a few different online tutorials, and then made the teapot pad using the leftover scraps. I followed a tutorial from V & Co for the heart block, and echo-quilted lines around the heart shape.


I am happy to report that the gifts were well-received - and the tea cozy fits (albeit a touch snugly).


This project had the Gandalf seal of approval.

8.18.2013

[wip] one block down... 15 to go

completed 20x20" block
This is my first completed block for my sister's white quilt. I'm loving how this block turned out. The white-on-white fabrics stand out from each other, and the cream background fabric (Kona Bone) allows the white fabrics to pop. I chose Kona Bone rather than Kona White or Snow because I wanted to ensure that the white piecing (and all the work I did!) is discernible from the background fabric.

I completed this block yesterday, and then prepped a few others. It seems to be faster to do a bit of an assembly-line type production rather than see each block through from start to finish. 

The block turned out smaller than the pattern says it should - oops? I'm not sure how that happened, because the block is evenly 20x20", but as long as my blocks are all consistent, it shouldn't really matter.

I'm super excited about this project. I think it is turning out to be a lovely low-volume quilt, which is all the rage right now. 

Once again, I'm using Cluck Cluck Sew's Wallflowers pattern.

8.17.2013

[wip] it's a white christmas

cutting board, zebra rotary cutter, and scraps

My current work-in-progress is a request from my big sister. She asked for a queen size white quilt for this Christmas. I've started it already because Christmas is notorious for sneaking up on me, and I plan to give quite a few handmade presents again this year.

So I've been cutting yards and yards of fabric on my fabulous new island, and today I've been stitching, cutting, pressing, and stitching some more while watching reruns of The Great Food Truck Race.

This is going to be a long project - each quilt block contains about a bazillion pieces, and is a multi-step process. I'm following Cluck Cluck Sew's fabulous Wallflowers quilt pattern. My version of the quilt will be a lot quieter, with very subtle differences between each fabric. But I think it will be beautiful! I can't wait to see it come together.

Although I am so not excited to quilt another queen-sized beast!

can you tell this is scraps from 16 different fabrics?

8.07.2013

[completed] mother-in-law improv quilt wallhanging

my first improv quilt
This gift was actually completed back in May, for a June birthday, but was delivered in August. Oops.
This quilt wallhanging was made for my lovely mother-in-law. She had a bunch of my brother-in-law's artwork from school printed onto fabric, and I turned these amazing prints into a quilt!
I decided to do a modern improv quilt because the artwork was so abstract. I arranged the prints on my floor, and cut random strips of coordinating solids. I stitched and trimmed and stitched and rearranged and trimmed and stitched until I achieved the look I wanted. Adam was a big help during this process - which was great! He even helped pick out the solids I used (all from my stash!).

The back of the quilt features one print that didn't quite make it onto the quilt front, and black, blue and red solids. You can see the quilting pretty clearly on the back - I did a few stitched squares around each print. Since this is a wallhanging, the quilting didn't need to be dense.

back of the quilt

I finished the quilt off with black binding (Adam's idea) and stitched a hanging sleeve on the back of the quilt (not pictured).

In the end I think the quilt came out pretty much how I had hoped. It was just received, and my mother-in-law said she loves it! I'm so glad. This quilt was out of my comfort zone, but I think it was a good stretch for me.

8.04.2013

giant mistake

see the mistake?
Over the past few weeks, I've been working on a quilt for Adam's cousin's daughter's second birthday. Today I finished piecing the last row, ironed it, and starting trimming... and then realized I'd made a giant, irreparable mistake.
Oops.
I guess little Kinley won't be getting a quilt on-time for her birthday. I plan to remake this chevron quilt and donate this not-so-perfect version.
Sigh.
And just look how nicely all my points matched up...

7.08.2013

[completed] marriage cross-stitch

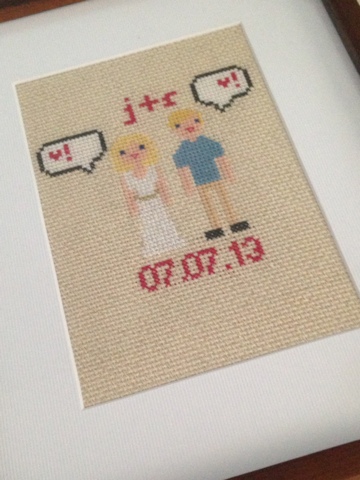
My younger sister got married yesterday and this is what I made the happy couple:


A cross-stitch of themselves on their wedding day! (This is not the best picture of it). J's dress is stitched in a shimmery white floss to capture the silk of her actual dress, and i used metallic gold to represent the hand-embroidered white-and-gold belt (made by our mother) that she wore. R's outfit was stitched with a blue floss for his shirt (which matched surprisingly well given I didn't see the shirt until the day of the wedding!). 
There are word bubbles containing hearts (symbolizing their words of love) with exclamation marks, and their initials and the date. Their cross-stitched selves have big smiles - just as they did at their wedding.


5.23.2013

dyeing burlap


orange-pink burlap!
After completing my pink burlap lampshade, my darling sister requested a similar lampshade, only in the orange-to-pink color family. Of course, burlap does not come in any such shade, which meant only one thing: it was time to dye some burlap!
I did some quick searching to make sure that burlap will take dye - which it will, since it is 100% jute, a natural fiber - and then stumbled upon Rit's amazing color guide. Seriously. It's amazing. It has a whole section called "Yellow-Orange-Peach". Perfect!
Intentionally I wanted to a color (#79, if you're curious) out of the "Orange" section. My impatient self wasn't willing to drive all the way to Jo-Ann, so I checked out the Rit dyes at my local Wal-Mart. No cherry red or golden yellow - the only two colors I needed. So I whipped out my phone and checked all the orange-pink colors to see if any of them were a) an acceptable shade, and b) used only colors available to me. Luckily, I found #464, which requires scarlet and sunshine orange, two colors that the Wal-Mart carried. So I grabbed the dye, four yards (yes, four - just to be safe) of natural burlap, and a large plastic bucket.
dye bath
Today, in between bouts of furious packing, I dyed the burlap. That was my "fun" activity for the day. I washed the burlap in warm water, and then I set up the dye bath about 12 quarts of hot hot water, and two tablespoons each of the scarlet and sunshine orange liquid dye. I put the damp fabric into the bath and let it sit for about 45 minutes, swirling the water around frequently. I couldn't stir the fabric because there was simply too much and it was too heavy for my stirrer (an old paint stick) to maneuver around. But as far as I can tell, the burlap took the dye evenly. Then I rinsed the burlap out - which was easy, because it held onto the dye so fiercely - and ran it through a cold water cycle in the washing machine before drying it on a normal setting.

And voila:

gorgeous, right?
 I am SO pleased. It's exactly the color I wanted. Burlap sheds normally, but washing and drying it made it superduper fuzzy, though. Just a warning to anyone who tries this. I have no regrets, though - the end product is worth a little extra vacuuming.

I can't wait to make the lampshade. Sadly, that project might have to wait until I'm situated in the new house. And I still need to figure out what lamp base I'm going to use...

5.06.2013

[completed] sister's belated birthday present

completed embroidery!

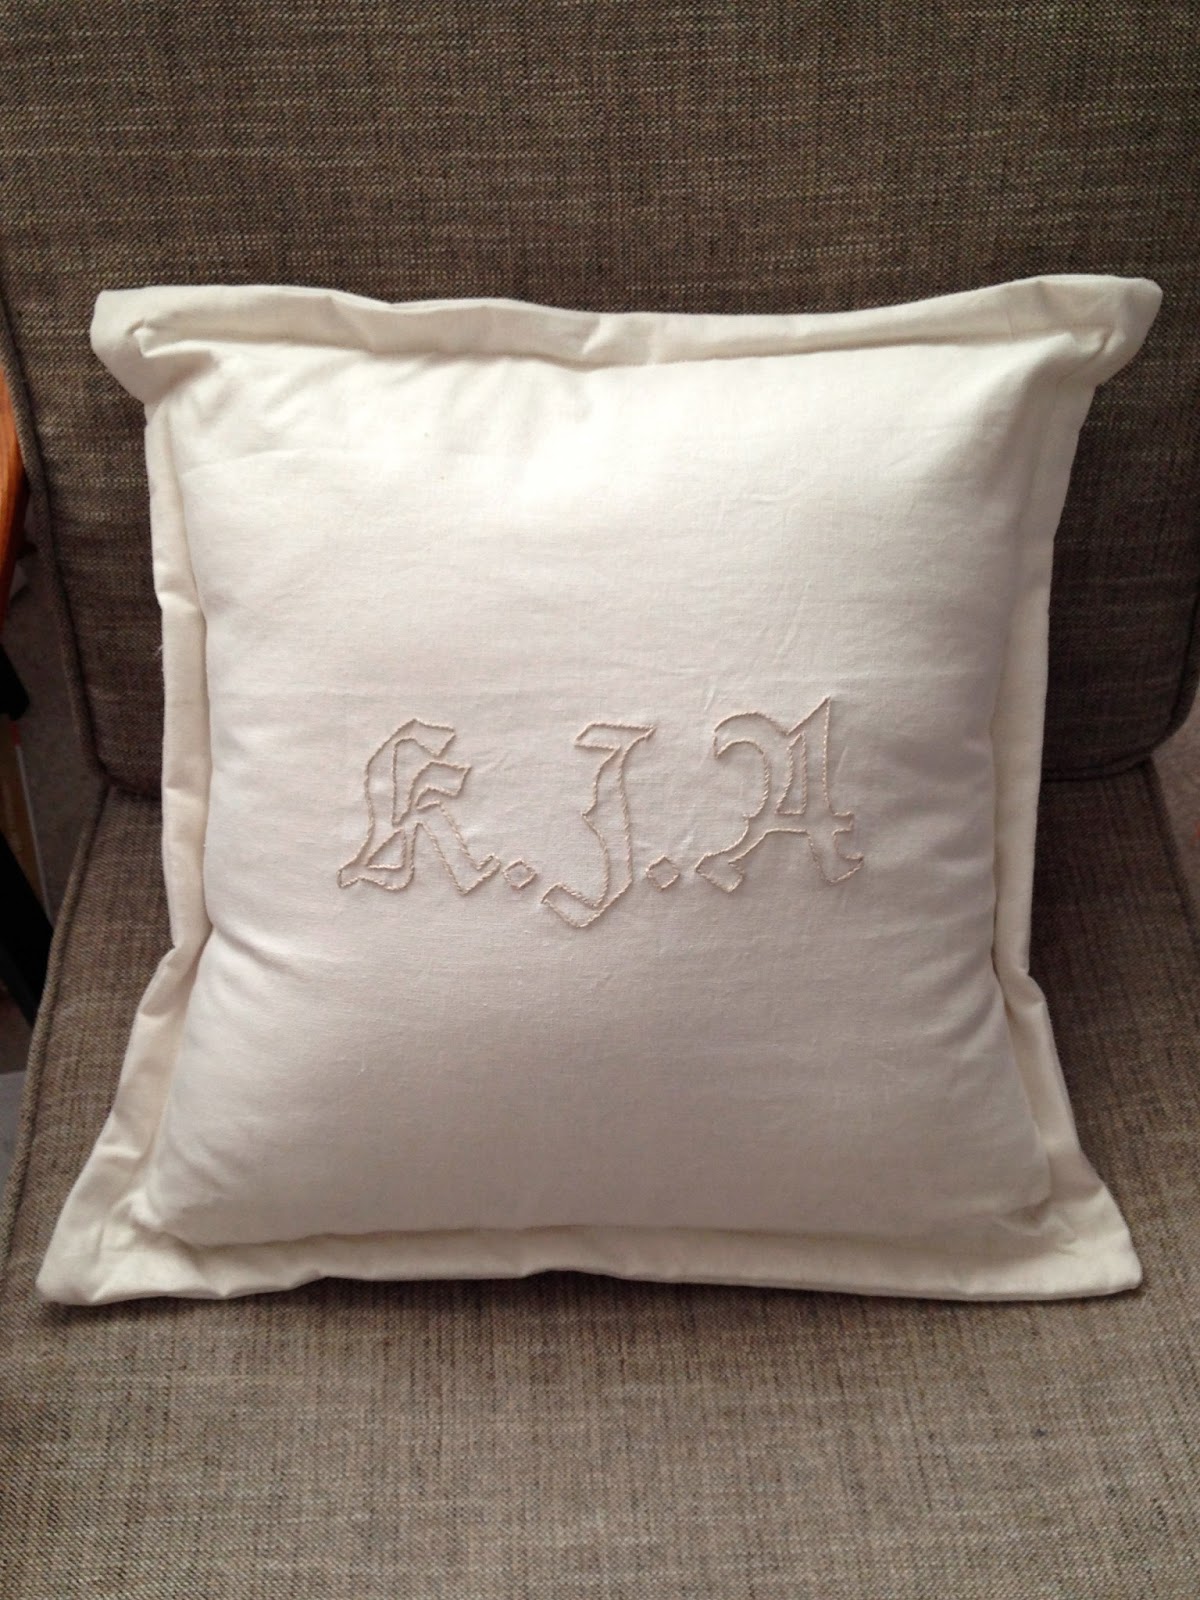
For my older sister's fourth 29th birthday, my younger sister and I decided to collaborate on a present for her using our respective talents for hand embroidery and sewing. The embroidery portion was competed while I was visiting my younger sister in Canada, and was finished in advance of the birthday date. I, however, was nervous about cutting into this precious hand-embroidered fabric, so it took me awhile to gather up the courage and make a pillowcase.
completed pillow (front)
But I (obviously) eventually completed it! I did actually finish it quite awhile ago, but I had to mail it to a far-off location, and it has just now arrived.

completed pillow (back)
Overall, I'm pretty pleased. I used a 18x18 premade pillow form and muslin to finish the pillow. We had decided on a pillowcase with a flange to give the pillowcase a little added interest, so I incorporated a 1" flange.

Hooray for handmade gifts!

4.23.2013

[wip] sneak peek of a super secret present

As much as I love love love giving handmade gifts, I almost hate working on super secret presents because I can't share the projects until they are done and received! I mailed off one present this week, and I've been working on another. I'll just share this little sneak peek.
trying to match up colors and corners
This present is an improvisational quilt, a type of quilt piecing I've never done before. It's harder than it looks! There was a lot of cutting and adding and cutting and trimming and all sorts of things. Usually my quilts are carefully planned out (and this usually works for me, please disregard the houses on a hill quilt!), but this project called for something a little more spontaneous. The quilt top is almost done, but it's not due for ages, so don't get too excited. I am just trying to finish some presents before we move and everything is chaotic/messy/needing to be unpacked for awhile.

3.27.2013

here fishie fishie

45 gallons of awesome
Meet the newest addition to our household: a beautiful 45 gallon fish tank with a black stand!

Adam has always wanted a big fish tank, and when I saw this tank/stand setup complete with fish and accessories for a steal of a deal, I decided to get it as a surprise present for him. (Sadly, he guessed the present before I actually got to surprise him with it - but he was thrilled, so it was okay).

Moving it in my little hatchback was easier than I had anticipated, although sound of the water sloshing around and the stand's door banging was a bit unnerving. Then, after I got home, I had no way to moving any of it into the house (Adam was at work), so I had to move all the fishies into a large plastic storage box and then crossed my fingers that they wouldn't get too cold. All went well, though - they are swimming around the tank now.

For now, we've set it up in the corner of the "dining room", under my favorite picture of us. When we move into our new house in two months (assuming all goes well), it will probably go in the corner of the kitchen.

Adam is very excited (although I'll be doing all the work). The tank came with two plecos (one huge one and one fairly small one), three mollies and a large rainbow shark. I am giving away the small pleco and the mollies today so that we can add Adam's favorite fish: angelfish! His brother has giant gorgeous angelfish, and I think Adam is a wee bit jealous.

Adam is excited, I'm excited, and Sassy is certainly excited.

3.25.2013

[sneak peek] belated birthday present

orange thread snips, oatmeal aida, stitches and needle
Yesterday, I had a wicked headache, so I spent the day working on a very special cross-stitch project for a very special friend. Unfortunately, the headache decided to stick around today, so I will be working on this project some more while I try avoid anything headache-inducing (like this computer screen!).

Hopefully this headache will have the unexpected benefit of motivating me to finish this overdue present, and I will be able to complete it quickly! Cross-stitching always takes me longer than I expect, and I'd like to send this present off to its intended recipient soon.

sneak peek of the pattern and project

3.08.2013

a rose for emily

rose!
My darling little sister has been crafting beautiful watercolor-painted coffee filter roses (check out her first one here!), and she graciously agreed to make me one so that I can have an everblooming rose of my own. We agreed to have it fade from red in the center to white outer petals, but the watercolors dictated a more pink rose. Which is fine by me, I love pink!

closeup!
The roses are carefully assembled with lots of little petals - you can see how she made the inner petals a darker pink than the outer petals. I love that effect!

leaves and a floral tape wrapped stem
I love that the rose also has leaves (which conveniently hide the tape used to secure the rose petals) and the white floral tape wrapped stem (made of a wooden dowel) is the perfect finishing touch. It's so elegant and lovely - I can't wait to display it in my home. I just have to figure out how to transport it safely...
a rose for emily
I feel loved!

3.07.2013

[completed] love you bracelet

hearts!

For the past two weeks, I've been residing in the Far North visiting my younger sister. We've been doing a lot of crafting together (check out her new blog!), and I've made a bunch of random things - the banner for her blog, paper napkin flowers, and lately, friendship bracelets. I haven't made any friendship bracelets since I was wee pre-adolescent, and lately such bracelets have been all the rage around the blogosphere. So I decided to jump on the bandwagon.

I had a number of miserable failures, but I finally followed this Purl Bee tutorial and successfully made a few bracelets. I am wearing a hot pink and yellow-lime heart number at the moment, and my sister immediately requested a similar heart bracelet in more subtle colors.

So, of course, I made her one.
Isn't she cute?
 She chose a peachy-pink and a mauve purple for her version. I followed this tutorial for attaching the clasps, and she chose a toggle clasp.


action shot!

pretty clasp!

2.22.2013

[completed] v-day masks

his & hers
To celebrate this past Valentine's Day, our local paint pottery place threw an awesome VDay event and posted details online. Adam and I immediately registered to be one of the limited number of couples present and paid a small deposit to ensure our seat. The event featured a buy one piece get one piece half off promotion - and there was even champagne, cheesecake, and chocolate covered strawberries!

We had a lot of fun, and it was a lovely way to spend Valentine's Day together. We spent our usual ridiculous amount of time trying to decide what to paint. Adam loves Venetian masks, so when I saw two different masks available, I knew we had to choose those to paint. We decided not to consult each other on how to paint the masks, but we still (accidentally) chose very similar color schemes.

hers
The above mask is my creation. I went with a solid red background, and painted on details with little squeeze bottles of cream and black paint. My mask is supposed to be feminine - see the eyelashes on the left eye? - but not too girly. I googled a few images while my background coats were drying to get inspiration, but tried not to be too literal. Overall, I'm really pleased with my mask!

his
Adam went in another direction entirely, and made a very abstract mask. He used the same red I did for the top portion of the face, and painted the lower portion of the face pink. Then he used sponges to dab on red for the checks and used foam shapes to do the black heart and question mark. I painted on the black teardrops for him, at his request. I think his mask is super fun and whimsical, and I love the punch of black. I made fun of him for his imperfect painting, but secretly I love it.

I can't wait to be able to hang up these masks somewhere (hopefully in a new house!). I think they will look great, and will always be a reminder of a romantic yet fun date night together!

1.28.2013

[completed] owl always love you

finished quilt!
For my younger sister's 24th birthday (can you believe it?), I made her a quilt. I was a little late getting it to her, but better late than never, right?

The idea for this quilt came about when I showed her the two snail baby quilts I made over the summer. She loved them and requested a birthday quilt from Boo Davis' awesome book. I showed her the options over Skype (which is basically the best invention ever!), and she chose the owl pattern shown on the cover. Through conversation, we decided that a snowy owl on a dark background would be neat.

This is the result!
closeup of the front
I took some artistic liberties and incorporated a range of white-on-white prints as well as one gray print for the owl's body and eyes. My sister did not like Boo Davis' mixing of prints, but I think a variety of prints helps give the quilt some depth and interest, so I chose to go with the more subtle white-on-white prints as a compromise. I added the gray print just to give the quilt a little more of a scrappy feel. I chose a rich dark purple solid as the background.

The quilt top came together surprisingly quickly, given all the many pieces. I had a lot of fun piecing it and watching the blocky owl shape emerge from the piles of carefully labeled strips of fabric.

quilt detail in the owl's head
I am really happy with how I chose to quilt this project. I stitched in the ditch around all the edges of the owl to begin with, and then filled in the owl's face and body with straight lines. Then in the owl's head, I quilted a herringbone pattern to suggest feathers. It took approximately forever, and my quilting got less precise as I went along. For the body, I just quilted the straight lines - I decided the herringbone "feathers" were more important in the owl's head, and continuing the pattern in the body would be too busy and too time-consuming.


So after I finished all my straight lines and herringbone quilting, I got to the fun part: the purple background. I decided to free-motion quilt stars, so that it would look like the owl was sitting against a starry night sky. I practiced the stars (inspired by this tutorial) in both white and purple thread, and decided I vastly preferred the stars in purple thread. The white would have made more literal sense, but would have dominated the quilt and I really wanted the owl to be the focus. So I quilted hundreds of stars in purple thread on the purple background. For the "whites" of the owl's eyes, I used stippling. I wanted the eyes to be different than the background, but also soft and not densely quilted.

The technique I used was pretty easy - I just created a star shape and then echo-quilted around it a few times before branching off and creating a new star shape. There were a few instances when I sort of forgot how to draw a star, especially when I was doing it at a weird angle, and so there are a few wonky stars. But since there are so many stars and no one star stands out, it doesn't much matter if a few are odd.
super wonky star
I backed the quilt in a super soft navy blue flannel. The white stitching of the owl's head and body stands out really clearly on the back of the quilt - so no matter which side is showing, the owl is present. There were about a million little threads to clip on the back, due to all the stopping and starting I had to do when straight-line quilting. Hopefully I got them all!
owl ghost on back of the quilt
The stars show up on the back of the quilt as well, but are not obvious. The purple blends nicely with the navy blue, and the texture created by the star shapes feels great with the flannel.

quilting on the back
The only thing I don't love about the quilting is how dense it all turned out. The quilt is still soft, but it isn't as pliable as some others I have quilted. I don't mind a slightly stiffer quilt, but I hope this one softens up a bit as it is washed and used.


I bound the quilt in a homemade navy and white striped binding. I chose the striped fabric because it coordinated nicely with the back of the quilt and the white owl, and it added a little visual interest. Once again, the binding was my nemesis on this quilt. Due to the inconsistencies of cutting, piecing, pressing and binding, the stripes got a little warped (as you can probably see above). I still love the striped binding - and overall I had an easier time attaching the binding to this quilt than I usually do - but it isn't perfect.

look at that tail twitch possessively!
sassy is going to miss this quilt!
I am happy to report that the quilt was well received!