Showing posts with label pattern. Show all posts

9.29.2013

[completed] aragon bag, take two

front
So I decided to make another Aragon bag. I am smitten with this pattern, although I have to admit that it is not the easiest to create! I just love the finished result - the bag has structure but is still pliable, the shape is fabulous, and the creative possibilities involving fabric, color, and pocket options are great.

This one is my homage to Betsy Johnson. I mixed two similar red and pink and black floral prints with brass hardware. I used one print for the main body and exterior pockets and combined it with the busier floral print for the exterior snap pocket, straps, and lining. For this bag, I experimented with using gold rings in the straps. I love that extra touch!

side
I also used a bright red as my accent color for the interior of the pockets. I love that little pop of extra color with the prints and the brass zippers.
back
 The back of the bag again features a long zippered pocket. Here you can see the red around the zipper. Love it!

lining
 The lining is the same floral print as the exterior pocket. The inside of the bag features a zippered pocket, a label of mine, and two gathered pockets for phones, pens, etc. All the raw edges of the bag are trimmed with bright green bias tape for an extra fun pop of color.

it stands without support!
I added more interfacing to this version of the bag than I did with my first, and the result is much better. Although my first bag stood on it's own, this bag stands taller and feels more structured. The finished bag is 16 inches wide and 10 inches tall with 13 inch straps. Perfectly sized for carrying, well, anything!

Once again, I love this pattern and the resulting creations, and you'll definitely be seeing more Aragon bags in the future!

9.24.2013

[completed] aragon bag and pattern review

While pinterest-ing the other day, I found a new Sew Sweetness bag pattern, the Aragon Bag. I knew instantly that I had to make one. So I did!

finished aragon bag

Although I've admired several of the Sew Sweetness bag patterns, I've never taken the plunge to buy one. But for $9.00, this pattern was mine! I went to Jo-Ann's to get all the necessary materials, and found this great gray cross-hatch fabric. I combined it with a fabulous colorful peacock print on gray (for the lining and the straps) and used hot pink as an accent color. 

side view

I splurged on metal zippers, since they look so much better than plastic zippers and seem more durable. There is a 22inch zipper for the top of the bag, and a 14inch zipper for the zippered pocket on the back. The bag also has gathered pockets on the sides for stashing small-ish items. There was also supposed to be a zippered pocket and gathered pocket inside the bag, but I ran out of fabric. 

the back
The front of the back has a nicely sized pocket with a magnetic snap (my first time installing a snap!). 

the front snap pcoket

Overall, the pattern was easy to follow. I had no trouble figuring out what to do, just how to do it. But there were a multitude of helpful photographs of the tricker steps. My only complaint about the pattern is that I didn't end up with enough fabric for all the pattern pieces. I'm not sure if I cut wrong (there is no cutting diagram) or what, but I would definitely buy extra fabric next time. That aside, I love the end result, and I am so pleased!


5.14.2013

[wip] giraffe shirt

cutting cute giraffe fabric
featuring a scented sachet as a pattern weight
Today, in between running errands and being super productive, I decided to make another top using the same pattern as my last one. When I learn something new, I like to practice those skills multiple times to solidify the knowledge in my mind. Practice makes... better memories?

Anyhow, isn't this giraffe fabric just the cutest? I'm pairing it with a matching turquoise solid for the yoke.

4.25.2013

[wip] sneak peek of "dare to be different" quilt

happy colored scraps
While browsing the Internet last night, I stumbled upon this "Dare to be Different" quilt and was immediately inspired. I drafted a similar pattern, chose some fat quarters, and today I started cutting and sewing. The quilt top is coming together very quickly, and I think it's going to be perfect for spring. I can't wait to finish it and reveal it!

4.23.2013

finding quilt patterns in the ordinary

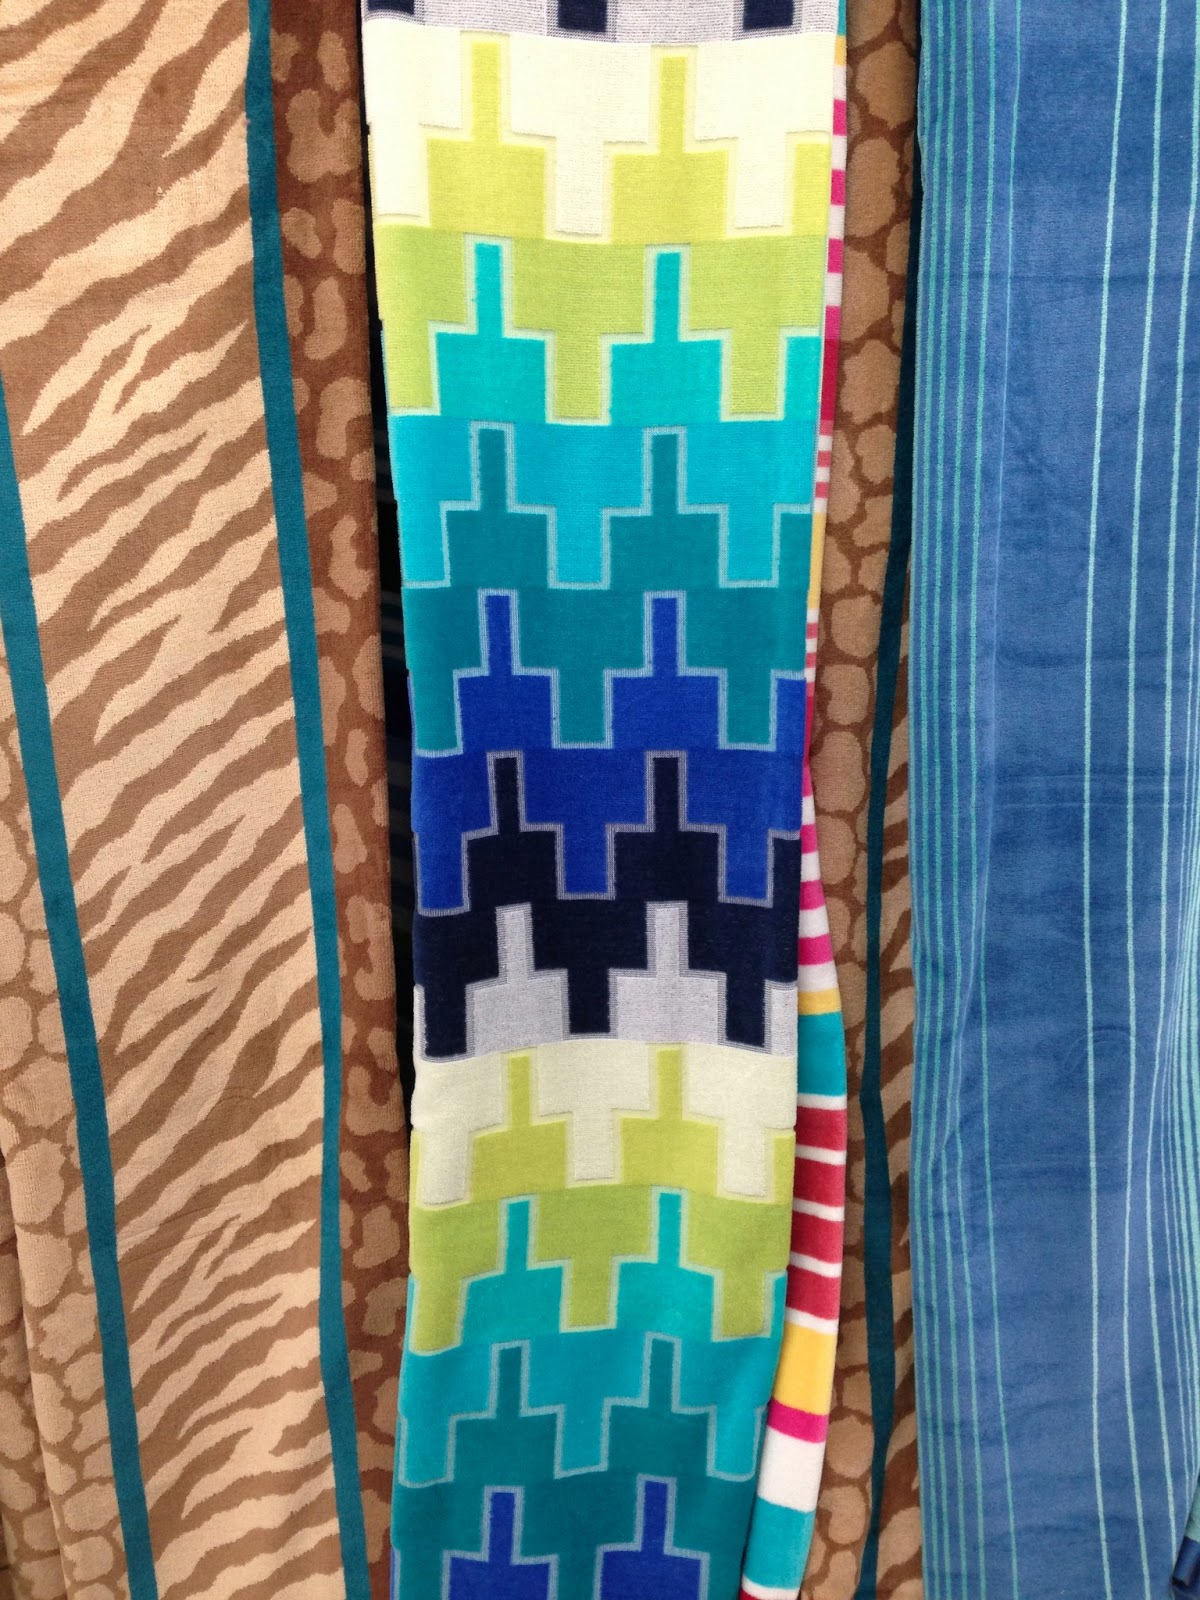
towels at walmart
While Adam and I were walking through our local evil Wal-Mart, I spotted this fabulous blue and lime and white towel. I loved the pattern and the color, so I snapped a quick picture for later reference. I'd love to make a quilt inspired by this towel! One day...

4.14.2013

[wip] houses on a hill quilt top

absurdly proportioned quilt top
 Yesterday, I started a new quilt top, inspired by this Moda Bake Shop quilt. I call this quilt "houses on a hill".

As you can see if you follow the link, my quilt is not at all the same as my inspiration. I wanted it to be more colorful and look like houses on a hill (hence the name), with sky at the top. But I messed up the proportions - when I laid out all the pieces, I failed to account for the sashing in between the rows of houses. All the fabrics for this project came from my stash - the "houses" are made from a charm pack I've had for ages, and the green "grass" fabric is from my stash. The blue for the "sky" is leftover scrap from this quilt.

I was very careful to ensure that the green fabric, which is a directional print, was always arranged so that the print flowed in the same direction. I'm very disappointed that this quilt did not turn out as I had anticipated, although I honestly didn't spend a lot of time on it.

I might take off the bottom few rows and use them on the back of the quilt. Or I could add borders to the sides? Or both? I'm not sure what to do yet. I don't want to distract from the overall plan of the quilt (the "houses on a hill") with borders... So I haven't decided. This quilt top will probably be added to my stack of WIPs while I think on it. Which means I can start another project!
closeup

2.10.2013

[wip] superhero granny square quilt


Today I decided to turn some of my colorful scrap squares into something real. So I stitched together a piece of Spiderman and some red, yellow and black squares into a granny square block, following this tutorial.


This is the result!

This is my first time working with so many tiny pieces (the squares finish at a mere 2 inches). It's honestly a bit tedious, but I like the result. I haven't decided how many of these granny squares I'm going to make, but I have lots of scrap squares!


2.07.2013

tiny colorful scrap squares

piles of 2.5inch squares
 Yesterday, I decided I wanted to make another scrap quilt. I've been determined to use up my stash, and the scrap bin was still overflowing (despite making a scrap quilt already). I wavered for a long time between making a granny squares quilt or a modern scrap baby quilt. Then I realized that both quilt patterns require 2.5inch squares, so I set aside my internal disagreement about which pattern to follow and started cutting up scraps. As you can see, I have a rainbow assortment. Each color pile has at least four different prints in it, and the stacks are surprisingly tall.
so cute
I've been playing around with different arrangements of the fabrics, and I think I will start off trying to make a boy granny square quilt, using my superhero and novelty fabrics as the centers of the granny squares with rings of bright non-pink colors. But I can't decide what I want the background fabric to be - grey? I think that would work best (the only white I have is a floral tone-on-tone print, which doesn't suit this concept). I also have tone-on-tone black prints, but that might make the whole thing too jarring. So I think grey would be best - and I have enough in my stash. I am just loath to use it because I don't want to have to buy more for another quilt!

That's the drawback of only wanting to use your stash... I recommend stocking up on basic neutrals before deciding to rely on the stash alone!

1.20.2013

[completed] scrap quilt top!

completed quilt top!
Forgive the poor photo - it's dark outside. But this is the completed scrap quilt top! After some consultation with my mother, I decided to add more blocks and add a border. The added blocks and the 4 inch border bring the quilt to a nice 44 x 56 size. Perfect for a kiddo.

I had to cut into my stash for some more white fabric (all the white sections are white-on-white prints, by the way), and for the black and white border. But the majority of the quilt came from my scrap box, which is awesome!

Now I just need to figure out a backing...

[wip] scrap arkansas crossroads quilt

I've been working on a few projects here and there lately, trying to reduce my WIP pile, but nothing has been really grabbing my interest. I've been seeing a lot of scrap quilts around the blogosphere, so I started researching scrap quilt patterns. I found a few favorites, but ultimately gravitated towards the Arkansas Crossroads pattern because it was fun, looked complex but is actually easy to complete, and would use up a lot of my smaller scraps.

scrap quilt top so far

I spent the last few days sorting scraps, cutting colored scraps into 3.5 inch squares and my white scraps into 6.5 inch squares, and stitching it all together. I have way more colored scraps than I used in this quilt top - I decided to go for a calm, blue-black-brown-gray palette. These blocks go together pretty quickly, and I think I will make another one of these quilts with my more vibrant scrap fabrics.

The picture above is nine 12.5 inch square blocks carefully arranged to compose the Xs and star shapes. I have run out of white scraps, but I have quite a few little colored squares leftover, so I might cut into my stash of white fabric to make the quilt top bigger. I want to keep it a child-friendly size, since I plan on donating this quilt, but it's currently only about 36 x 36 inches. I am also considering adding a border (or two) to make the quilt bigger, but can't settle on what fabric to use for that. So for now, the quilt top is going to stay like this, I guess!

Any suggestions for how to finish this quilt are welcome!

1.14.2013

[completed] two more two-zip hipster bags

For two of my closest friends, I decided to make two more of the two-zip hipster bag that I had made for my cousin. Like my cousin's bag, these two cross-body bags feature adjustable straps, an outside slip pocket, a zippered outside pocket, and interior slip pockets.

For my old friend Erin, I chose a purple and white striped fabric with dark purple zippers. I chose a solid lavender for the lining.
front of Erin's bag

inside of Erin' bag
back of Erin' bag
 For Jess, I chose to use three fabrics - a solid Kona green, a green white and black print fabric for the outside pocket, and a fun green owl print for the lining. I chose black zippers to contrast with the fabrics.
front of Jess' bag
inside of Jess' bag
outside pocket on Jess' bag

finished bag!
I had a lot of fun making these bags (especially utilizing all fabrics from my stash), and both bags were very well received!

10.05.2012

[completed] tshirt memory quilt

back and front
 Today, I finally finished my cousin's tshirt memory quilt, which I started back in August. I was going to keep this finished quilt a surprise, but I don't think he'll ever see this post, so I think I'm safe.

So here it is!

the front

The front is composed of differently-sized squares and rectangles cut from 21 of his tshirts, sashed with red, black, navy, white and grey solids. I finished it off with a scrappy border from the leftover solid fabrics. I was provided with over 40 tshirts, and I chose these because of the similar theme (sports), and the quality and sizes of the shirts. I love the random pop of the one orange shirt.


closeup of the top

 I took some of the details from the shirts that were too small to use int the quilt top, and appliquéd these pieces onto some of the open spaces in the quilt. I think these extra additions made the quilt top more interesting, and also incorporated more of his shirts.

I did a large (think gigantic) stipple for the quilting, and used grey thread so that the quilting wouldn't be super obvious. I wanted the tshirts to be the focus of the quilt. The quilting turned out really well - it was fast, and because it was so big, the quilt maintains soft and flexible.

the back
I initially was going to make an interesting back with some extra tshirts, but I ultimately decided on a solid backing.  My cousin requested red, grey or blue for the backing, and I chose grey. I like the contrast between the super busy and vibrant quilt front, and the calmness of the solid back. I like that it is versatile.

I bound the quilt in homemade straight-grain navy binding, and used a zig-zag stitch to attach the binding to the quilt. Once again, the binding was my nemesis in this quilt, but I think my mistakes were pretty minor and ultimately unnoticeable.

adam modeling the quilt
The quilt finished at a generous 60 x 90, so that my cousin will be able to use it as a big throw or on a twin bed.

I will be sending it to him for Christmas - I hope he likes it! I am happy to report that despite starting this quilt back in August, I have completed it ahead of schedule!

Now... onto the other quilts I have to make before Christmas rolls around!

8.29.2012

[completed] summer skirts

first garment ever made by me
A few days ago, I found a pin on my mother's pinterest of great skirt tutorials. I decided to try one out - a (seemingly) easy gathered skirt. My attempt at a skirt failed miserably. I sewed and ripped out stitches and resewed and ended up with a confused pile of fabric. 
Undeterred, I googled "easy skirt tutorial", and found this tutorial on the Etsy blog. I decided to try it out, but instead of buying more fabric, I riffled through my stash, and found a one yard remnant in a pretty floral pattern. I followed the directions to a T, and found the instructions far simpler (and easier) to understand than the first pattern I tried.
I ended up with the skirt you see above - a simple gathered skirt with an elastic waist. Very casual and fun. 

Today, I bought a few more fabrics to try out some variations on the pattern. And I ended up with...


A lined brown polka dot skirt with pockets. It took me about an hour and a half to complete, from cutting to photographing. I adjusted the pattern to make the skirt slightly shorter (a change I did not like), and to add a lining and pockets. (I used the instructions from the first pattern for the pockets. The pattern does not include a template, so my freehand pockets are too shallow). I figured out how to add the lining on my own through trial and error.

it's lined!
In the end, I used just under a yard of the brown polka dot fabric and the brown lining fabric. I used knit elastic instead of woven elastic, which did made my life more difficult. But I managed!

The instructions say to stitch the hem just the once, but I did two lines of stitching 1/4 inch apart to make it look a little more "handmade, not homemade", as you can see below.

stitching
I will be posting a tutorial on how to make a lined, pocketed gathered skirt just like this one in a few days. For now, I am off to wear my new skirts (not both at once, of course) and enjoy the summer heat!

skirt! a little above the knee!
awesome tshirt and skirt

5.04.2012

birthday craft project


sewing machine cover!

Today I had a pretty good birthday. To celebrate, I took time off from writing papers and embarked on my first time using a traditional paper pattern. I found Simplicity A2106, which is a pattern for a sewing machine cover, at Wal-Mart a few days ago. Today I decided to try and make it. And make it I did.
Working from a paper pattern was difficult for me, as there are minimal instructions included with the pattern and lots of flimsy pattern pieces to cut out and then cut around. But I made it work! It was my first time making prairie points (which are super easy), and first time using pom-poms.

prairie points

I choose black and white prints, and then used the white pom-poms (as included in the pattern) for decoration.
My cover doesn't stand up as nicely as the one shown on the pattern - there isn't any interfacing, so a little floppiness is to be expected. Also, the cover is quite a bit larger than my machine.
The cover is lined with fleece for padding (I guess?) and then lined again with pretty fabric to hide the fleece. There is a handle on top for easy removal and handling, and a large slip pocket (topped with pom-poms) on each side.

pom-poms and pocket

Overall, it was a successful project, although I'm not sure I would say "It's So Easy" as it was advertised. But it wasn't really difficult, just time-consuming. My cover is far from perfect, mostly because sewing over the pom-poms is nearly impossible. If I were to make it again, I would definitely make some changes. But I'm pleased - and it really doesn't require much fabric.
Now, why did I choose this time to make a sewing machine cover? One, because I've heard covers help keep machines clean. And second, because I got a new shiny Singer 9960 for my birthday! You know, the one I wanted. It's still in its box waiting for a free moment. I wanted to have a cover for it before I exposed it air and dust and sunlight. The manual, which I've read cover to cover, says the machine shouldn't be exposed to direct sunlight, which is a problem in my sunny sewing machine. Solution: this cover!