Showing posts with label cross-stitch. Show all posts

7.08.2013

[completed] marriage cross-stitch

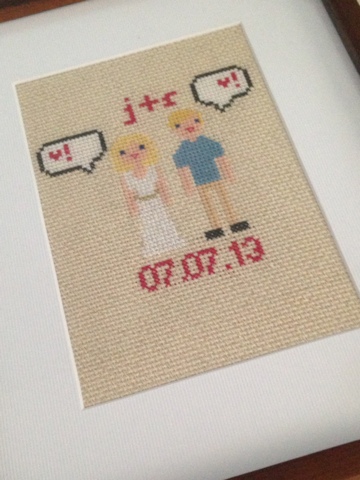
My younger sister got married yesterday and this is what I made the happy couple:


A cross-stitch of themselves on their wedding day! (This is not the best picture of it). J's dress is stitched in a shimmery white floss to capture the silk of her actual dress, and i used metallic gold to represent the hand-embroidered white-and-gold belt (made by our mother) that she wore. R's outfit was stitched with a blue floss for his shirt (which matched surprisingly well given I didn't see the shirt until the day of the wedding!). 
There are word bubbles containing hearts (symbolizing their words of love) with exclamation marks, and their initials and the date. Their cross-stitched selves have big smiles - just as they did at their wedding.


3.25.2013

[sneak peek] belated birthday present

orange thread snips, oatmeal aida, stitches and needle
Yesterday, I had a wicked headache, so I spent the day working on a very special cross-stitch project for a very special friend. Unfortunately, the headache decided to stick around today, so I will be working on this project some more while I try avoid anything headache-inducing (like this computer screen!).

Hopefully this headache will have the unexpected benefit of motivating me to finish this overdue present, and I will be able to complete it quickly! Cross-stitching always takes me longer than I expect, and I'd like to send this present off to its intended recipient soon.

sneak peek of the pattern and project

6.19.2012

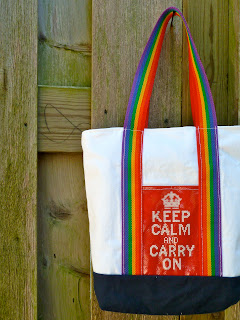
completed: double-sided PhD tote bag

the calm side
the panic side

My younger sister starts graduate school in the fall, so I've prepared an all-purpose zippered tote bag for her to use for school. (Don't tell anyone, but this gift was supposed to be a birthday present months ago. I think it's more fitting as a graduate school gift, though). 

This project was truly a labor of love, between the doing the two cross-stitches and then making the bag itself, but it turned out totally worth all the work.


I used a bunch of tutorials for different parts of the bag - New Green Mama for the main idea of the bag, Projects by Jane for the recessed zippered top, and Sew Mama Sew for the interior slip and zippered pockets. And then I added my own twist to the whole thing, of course.


Each cross-stitch is also a lined pocket and I used iron-on vinyl to cover the cross-stitches (so that they are impervious to weather and wear), rainbow webbing for the straps, and a big red sport zipper to secure the top of the bag. Everything is double-stitched for durability and security. The bag has boxed corners and interfacing so that it will stand up on its own, and it is lined with a fun dinosaur print, with a two slip pockets on one side and a zippered pocket on the other side.

fully lined with dinosaurs!

I also made a coordinating pencil pouch out of the leftover white canvas, dinosaur fabric and rainbow webbing. The pouch is made using my 3DS case tutorial, just with different measurements. I filled the pencil pouch with mechanical pencils that are designed to look like regular pencils, extra lead, colored pens, fun erasers and a highlighter. I also tucked a notebook and matching folder into the bag so that my sister will have everything she needs (weil, some of it, anyway) to start school!

surprises inside
Overall, I love this bag. I was tempted to keep it. But I can always make another one!

looks good on me, right?

the cross-stitches

the back of the cross-stitches

5.25.2012

new items in shop!

remember this? now you can have your own!
Check out my etsy shop for cross-stitch and quilt goodness!

5.18.2012

completed: geeky binary love cross-stitch

01001001000100000011011000011011110111011
00110010100100000011110010110111101110101
i love you

This is a cross-stitched code of binary that translates to "I love you", and is a surprise gift for Adam. 
I've been working on this cross-stitch for the past two days. Cross-stitching always takes longer than I expect!
It is cross-stitched using three strands of black embroidery floss on "grasshopper" green 14-count Aida, framed in a simple black 5 by 7 inch frame. The color scheme is reminiscent of old computer screens. 
It took almost two skeins of floss to finish this pattern (which I designed (if you can call it that) on 14-count graph paper). I was inspired by techie fonts, and I found one sample that only had "ABC123", so I took the "1" from that and then made up the "0" to match. I used a simple heart at the end to finish the design.

design on graph paper

1.02.2012

completed: emily and adam cross-stitch

For our anniversary, Adam is getting me (or allowing) professional photographs of us taken. It's our paper anniversary, and photos are printed on paper. So that works. For him, though, I knew I wanted to do something similar to the photographs - but with a crafty twist! Remember these cross-stitch portraits? Well, I had the same Etsy crafter (Wee Little Stitches) make a pattern of me and Adam, and yesterday I whipped it up rather belatedly for him.
The pattern calls for me to have long hair (as I did until last week), so I tried to alter it to have short hair and I don't love the look. Oh well! I added the three hearts as well - and that's a change that I like.
I do love the 4x4 inch mirrored frame that I found to put the cross-stitch in. It looks lovely. especially with the silver-threaded Aida that is totally my new favorite.
We also exchanged cards, because cards are made of paper. Also because I love cards. Overall, it was a lovely low-key first anniversary!

12.25.2011

completed christmas presents one: cross-stitch portraits

for my mother

for my older sister

for my younger sister
For Christmas presents for my mother and my two sisters, I made cross-stitch portraits of us three girls. It was originally just going to be for my mother, but after I stitched up my sample one (not pictured), I decided it was so adorable that I had to make one for each of my sisters as well. I had the basic pattern custom-designed for me by Wee Little Stitches (and they were a pleasure to order from), but I altered the design each time I stitched it to change the outfits and colors and hair styles.
I ended up making four of these - starting with my sample, then my younger sister's, then my older sister's, then my mother's. My younger sister got "sisters" embroidered on hers as well, but I decided I didn't love it and didn't like doing it (I am bad at backstitching, which is weird) and so I didn't include it for the other two.
The one for my younger sister is stitched on linen and then stretched over a small 4x4 inch canvas, while the ones for my older sister and mother are stitched on 14-count Aida and framed. I love how they turned out, and I mastered french knots (at last!) in the process. Each cross-stitch took about five hours (more or less, sometimes more) to complete. Definitely worth it. One of these days I'm going to make a fifth one for myself.
Although my family is in Wisconsin for Christmas, I got to Skype with them while they opened their presents from me, which was great. All of them seemed to love the cross-stitches, which was wonderful and exactly the reaction I was hoping to get. Hopefully these cross-stitches will always remind them of our love for each other!

11.14.2011

Whose shapes return, some frequently, some seldom, some by night and some by day...

Last night, I decided I wanted to make a little cross-stitch for a friend (who almost certainly doesn't read this blog) that I haven't seen in a long time. I chose an appropriate quote - "life is but a dream whose shapes return, some frequently, some seldom, some by night and some by day" by James Thompson - and chose black and grey variegated thread. Today, flushed with victory after the Scrabble game, I sat down to cross-stitch. Some time later, I finished it and framed it in a 4x6 black frame I happened to have. Voila!

7.11.2011

Completed Present: Irish Cross-Stitch

Last month was my fabulous mother-in-law's 50th birthday! To commemorate such a momentous occasion, I made her a pair of cross-stitched pieces. She had originally planned to travel to Ireland for her birthday, so I decided the cross-stitches had to be Irish-themed. Hence the giant shamrock and the "May the luck of the Irish be with you" saying.
The second piece is of a little Irish piggy bank (she loves piggy banks) with golden coins falling into it and the phrase "feed me coins" underneath. I did like three versions of that piggy bank in various shapes and sizes, but settled on a slightly-altered version of Andwabisabi's piggy bank design.
These were fun to sew, except that metallic thread may be the bane of my existence. It's so slippery and evil. But it's so shiny and so worth it in the end.

6.20.2011

Wednesday Work In Progress / Life Updates

So I got my bit of a job, and started work on Monday. It's simple, easy, satisfying work, so that's good. I finished the second of the two crafting projects/presents I was working on, and that's good also. We'll be moving very very soon, and I'm very excited about that. I can't wait to settle in somewhere, and decorate, and make a home. It's been awhile since I was able to do that, and feel at home where I lived.
This project is my current work in progress - it's another "home is wherever I'm with you", but done in bright alternating colors. There's no pattern - the color for each new letter is decided by the roll of a six-sided die. That was Adam's idea, and I think it's brilliant. (Of course, sometimes I re-roll the die if I don't like the color it chooses!). Obviously I'm not done, and it's slow-going because I've been working and packing and doing an astonishing number of loads of laundry and generally getting ready to transition into a new phase of life. I started it in our current place of residence, worked on it in San Diego, and will finish it in our new home!

6.03.2011

"I Love You Beary Much"

Today I got to see my grandmother for the first time in like five years. This is the cross-stitch I brought her as a gift to show her that I've been thinking about her, and love her. She seemed to like it, and even said the little teddy bear face looked like my face! I'll take that as a compliment, as he's pretty cute. While I was making it, Adam said the 'y' looked too much like a 'g' and the 'u' looked too much like an 'o'. But I think it turned out fine. I'm happy with it!
While I'm here in California on vacation, I've been working on a new version of the "home is wherever I'm with you". So far it's turning out pretty well!

5.29.2011

"Home Sweet Home"

Today I completed a little thank-you gift for my aunt and uncle, who I will be visiting on Tuesday. It's a simple home-sweet-home design with little houses, personalized with their last name. Adam helped choose the colors, trying to keep me from making it look too American-flag. (I just love the red-white-and-blue, apparently!). Isn't it cute? There are a few things I'd changed if I made it again - like maybe making the doors a little shorter and the houses a little farther away from the lettering. But overall, I'm happy with it!

5.27.2011

Felt Frame How-to

Today I'm going to show you (with pictures!) how to make a felt frame for a cross-stitch piece. It's super fast and easy, and a good way to display your cross-stitch pieces that don't fit nicely in frames.

Materials:
  • Cross-stitch piece all pressed and ready to go
  • 2x pieces of felt (one for the front and one for the back of the frame)
  • Embroidery floss
  • Scissors
  • Needle
  • Embroidery hoops (or other traceable object) - I used 6" and 4" hoops
  • Pen
  • Ribbon for hanging (cut to desirable length)
  • Pins (optional)
  • Ruler (optional)

Step one:
  • Trace the 6" hoop (using the inner ring so you don't run into the clasp) on the piece of felt you want for the top of the frame (I used pink felt). Cut out carefully.
Step two:
  • Place the 4" hoop inside the circle you just cut and measure if you want it to be placed perfectly. I eyeballed it and then measured to confirm. Trace the circle.
Step three:
  • Fold the 6" circle in half and make a cut inside the 4" circle you just traced. Then cut out the 4" circle carefully. Discard.


Step four:
  • Place the pink 6" circle on the white felt (or whatever color you chose for the backing) and cut out a matching back piece.


Step five:
  • Place pink 6" circle on the cross-stitch piece and cut the cross-stitch to fit.


Step six:
  • Pin all three layers together. You're now ready to start stitching!
Step seven:
  • Use a whip-stitch or blanket-stitch (as I did) to attach the three layers together. Make sure to tuck your ribbon inside the three layers and securely stitch in place.
Step eight:
  • Admire!
Additional options:
  • You can also stitch around the 4" cut-out, as I did.
  • You can decorate the frame with felt cut-outs (I used green hearts).

5.26.2011

Doing my own charts

I just successfully (more or less, let's say more) charted out the "keep calm and carry on" and "now panic and freak out" based on a design by my favorite cross-stitcher. Huzzah! Of course I'm all wrapped up in a project that isn't due for months and months and avoiding finishing the ones that are due soon! Isn't that always the way?

I can't update with any progress shots of the work I am completing because it's all presents for various people!

5.25.2011

"Home Is Wherever I'm With You"

Here is my latest cross-stitch project, which took a good few days to complete. The text is a quote from the song Home by Edward Sharpe and the Magnetic Zeros, which Adam loves. I made it mostly for him, but also because I found this version of it and it inspired me. I tried to play with color in this piece, but I'm not 100% happy with how it turned out. The "wherever" is actually a dark rose, not a red, but it looks red. It started looking very red-white-and-blue and patriotic, which was not at all the feel I was going for, so I threw the pink and yellow in there. It just doesn't all gel together. It was also originally supposed to fit in a 8x10 frame, but it ended up fitting perfectly in a 5x7 frame instead. Just goes to show that you never know what will happen when you're crafting!
I think I'm going to redo this piece with some fun colors on white and have a wider border around it so that it won't look lost in a 8x10 frame.

5.23.2011

Felt Frame

Remember that tree I made? I decided to make a felt frame for it, since it wouldn't fit nicely in any regularly sized frame.I decided on bright yellow to complement the yellow thread. I used a 4 inch embroidery hoop to trace out a circle for the tree, and cut a 6 inch square frame out of felt around it. I then blanket-stitched the pieces together with dark blue floss. All that's needed to complete it is a cute ribbon to hang it with!

5.21.2011

Custom Design

My custom design from Andwabisabi was finished yesterday! She was super friendly and helpful, I definitely recommend her for custom designs! As soon as I gather the appropriate materials, I have this project to do. I can't wait! It's another super-secret present, and will hopefully will be well-received. Unfortunately the gift-receiver's birthday isn't for awhile, so I have a lot of time before I get to give it to them (but that also means I have a lot of time to finish it perfectly!).

"Crazy thoughts have quick wings"

Here's my latest completed project, finished last night (right before I went on a cleaning spree). The text is a quote from Save Me by Jem, a song I've been listening to a lot lately. This line just got stuck in my head for some reason, so I decided to put it into cloth and thread, alternating each word in silver and white, with a white butterfly. I charted it myself, which was pretty tricky. It's hard to make everything nicely centered - and you might be able to see that I didn't not do a perfect job. The butterfly is another design by Andwabisabi, not my own. I'm not at that stage yet!
My mother told me that butterflies are a motif for the soul, which just adds another dimension to the piece. Crazy thoughts, the soul, I get it. Do you?
Next up... I don't know! I have a couple of designs charted out, but I'm not feeling particularly drawn to any of them. We'll just have to wait and see!

5.19.2011

"I Hate Everything"

Just kidding! But that's the theme of this adorable yet snarky cross-stitch, my newest completed project. I got the pattern from The Purple Hippo's etsy shop, and I'm so glad I did. I say this all the time! The piece just makes me smile, though. I especially love the juxtaposition of the dour message with the pink bunnies and the blue heart. The colors in this piece are really vibrant and jewel-like. I'm not sure the photos really captures the colors correctly. I think I'm going to do another version of this pattern using the same colors in different places - maybe blue text, a pink heart, orange bunnies and purple flowers? I think so!
The second photo is of the back of the piece, so you can see how neat and tidy my stitching is... or isn't.
I was initially a little stressed when I started this pattern, because it was charted in 10 count graph paper. And I was like "oh noes but I am using 14 count Aida!". But I found this fabric calculator, which solved the problem! Apparently most patterns are charted on 10 count graph paper, so that calculator and I are going to become fast friends.
Next up: a piece I charted myself, using this alphabet. We'll see how that goes! It's super difficult to center all the text. We'll see how it turns out.

5.18.2011

Martha Stewart Cross Stitch

Say what you like about Martha Stewart, but her website has some good tutorials and very pretty, inspiring pictures.
I stumbled upon this collection of simple, cute cross stitch patterns on her website - just my style! I love the solid color designs, especially the yellow cat and red mouse. They remind me of my yellow tree - adorable and unrealistic.
After I showed Adam the yellow tree, he said I need to step it up and work on larger projects. I am working on one now that will probably be finished tonight (making it a two-day project, which isn't very long - his "love drug" piece took way longer). But I definitely gravitate toward these sweet, simple designs. They're just so cute!