7.29.2012

[completed] superman placemat


placemat!
Today, I finished my WIP Superman placemat from a few days ago. It was quick to finish - a few lines of quilting, a quick binding, and ta da! A nice little project done in just a few hours.

front
I still have three more to make for a complete set, but I'm pleased with how this one turned out. I am annoyed (a little) that Superman is flying sideways across my placemat, but the text is oriented correctly, so I suppose it's just a weird print. What can you do?

It's a very patriotic placemat also, with the white and the red and the bright blue binding. Binding remains my nemesis, but I am pretty satisfied with the mitered corners, at least.

back
I love how the concentric boxes made by the quilting lines look on the back!

All in all, a fun little project! I love quick finishes.

[wip] dresser color scheme

so colorful
Here is the color scheme for the dresser! Did you expect that many colors? The color scheme was all Adam's idea, but I am doing all the actual work.

The bottom row of two drawers will be divided into the three primary colors (red, blue, yellow).

The second row of three drawers will be divided into the three secondary colors (orange, purple, green).

The top row of three drawers will be divided into the six tertiary colors (red-orange, red-purple, blue-purple, blue-green, yellow-green, yellow-orange).

So far I have painted four coats of yellow and red, three coats of orange, and two coats of yellow-orange. Oh, and two coats of chalkboard paint on the top.

I have a lot left to do, but it's beginning to become a reality!

7.28.2012

[wip] dresser progress

dresser madness!

I spent a good chuck of last night (and a little today) doing out the organization, math and measurements of my super-colorful dresser. Doesn't it look crazy? Don't worry, there is a method to my madness!
blackboard top and colors!
Last night and this morning, I reprimed the top of the dresser with enamel undercoater. Today, after the enamel undercoat dried, I painted the top with my new shiny blackboard paint. It doesn't look spectacular now, but after a few more coats, I think it will be awesome.

clipboard of important info!
Today I also painted two of the drawers (or rather, two sections of two drawers) red and yellow. The drawers will also need many more coats. That will take time, of course, but from everything I've read, many thin coats is superior to a few thick coats. And I've got nothing but time!

[wip] superman placemats


it's a bird, it's a plane, no it's...
A few days ago, I picked up a remnant yard of Superman fabric at Wal-Mart. I had no plans to use it, but I just had to have it. (I love buying remnants at Wal-Mart because they are almost always full yards or more!). Last night, while waiting for the paint on my dresser to dry, I decided to use my new acquisition to make placemats!

SUPERMAN!
I followed the placemat pattern in Dare to Be Square book by Boo Davis (which I once reviewed). It is my first time following a pattern from this book (although I have all the fabric to make a quilt following a pattern in the book...), and I loved the process. The instructions are super clear and easy to follow, complete with helpful diagrams. 

It took me under an hour to complete the top of this placemat (obviously it still needs to be basted and quilted), which included all the cutting time for the fabric for four placemats. I think that is not too shabby. I love quick projects.

Not sure what I am going to do with these placemats when they are completed - perhaps gift them? Who doesn't love Superman? 

he stops crime!

7.27.2012

[completed] hourglass scrap quilt

all done!
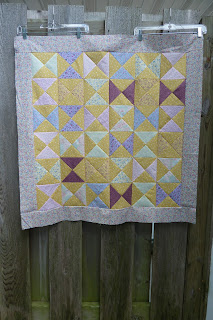
Today, I finished my hourglass scrap quilt! I only started it a few days ago, so I'm pleased. It is a very small quilt, so it was easy to do in only a few hours spread out over a few days. (The trick is just finding sewing time!)

front
The quilt measures approximately 36 x 36 inches, which definitely makes it a baby quilt. The soft florals make it a girly baby quilt.

This quilt was basically free to make - with the exception of the batting. All the quilt top (except the border) are scraps from a previous project. The border fabric was from the same bunch of fabrics that were given to me by my mother-in-law, so that was already in my stash. The backing is composed of leftover scraps from the back of the pinwheel quilt, and more of the pink roses flannel that I have yards and yards thanks to my mother.

back
I quilted very simply - stitch in the ditch on all the diagonal lines in both directions, and also around the inside of the border. The borders themselves are not quilted.

quilting lines
The quilt is bound in a white homemade binding. I've only used white binding once before, and I have to say I love it. It just looks so bright and fresh against the colorful fabrics. I know white binding can be a pain because bindings often get dirty, but I love it anyway.

labeled!
I put one of my new "craft the pain away" labels on the back of the quilt. I have plans to either sell or give away this quilt. For the moment, I am going to hoard it for "just in case".

Sass just loves my quilt

[wip] dresser priming

so exciting
Today I stopped at Lowe's on the way home from running an errand, and picked up an essential piece of my dresser plans: chalkboard paint. The top of the dresser is going to be a chalkboard! Isn't that exciting? I love chalkboards.

There is one catch with the chalkboard paint - it needs to have a latex primer or enamel undercoat underneath it - so my lovely fresh oil-based primer isn't going to work. Luckily, I have a can of enamel undercoat sitting (literally) below the dresser.

Looks like I'll be doing some more priming in a few hours!

wip: dresser primed!

after the first coat of primer
 Last night, when the garage finally cooled off after a hot, humid day, I painted the dresser with the first coat of primer. I actually had a little fun doing it. I'm using oil-based Kilz as my primer, and will be using regular latex satin paint for the topcoat.

after the second coat of primer
This morning, before it had a chance to get hot, I did the second coat of primer. I hate painting with primer, but the dresser is beginning to look better because of it!

The majority of the dresser will ultimately be white, so the primer gives me an idea of how the finished piece will look. I'm excited! Hopefully Adam and I will pick out the (many) paint colors for the drawers, and I can get started painting actual colors!

Stay tuned...

7.25.2012

completed: hourglass scrap quilt

ta da!
My hourglass scrap quilt top is now complete! I added 3.5inch borders to each size, so the quilt top now measures roughly 36 by 37 inches. I think the quilt is going to be precious when finished!

wip: hourglass scrap quilt

completed quilt top
 Remember the floral pinwheel quilt I completed ages ago? Well, I had a lot of little triangle scraps left over from making all those pinwheel blocks. I played around with different configurations of the triangles, sewed up a few trial blocks, and then put them all away for months and months. Well, I broke out that bag of scraps again recently and created this 32 x 32 quilt top!

I chain-pieced the triangles to make thirty-six hourglass blocks (a block I'd never done before), and arranged them randomly in a six by six grid. Today, I stitched up the rows of blocks and voila! A baby quilt top was born!

I think the quilt needs a border of some sort before it is really finished. However, since this is a scrap quilt, I don't have enough of the same fabrics to make a border. It's off to find something else in my stash that will work!

look at all those hourglass blocks

7.21.2012

meet Fidelity

meet fidelity!
It has been my goal for awhile to get out and see more local stores/places. Today, while looking for a sporting good store that sold darts, we drove past a mom-and-pop pet store called Pet Lovers Lane. I immediately pulled in to the tiny parking lot. The store has a lot of cool fish and random animals, but not a large selection. But the people there were friendly and knowledgable. There were adult male bettas on sale, and you know I just had to get one.

I've had this second tank since getting baby-July (it was an old wedding gift, actually, that I mailed to myself from Massachusetts), but haven't needed it because I bought July a large glass bowl on impulse. So I've been looking to get another, adult Betta. I needed Adam to be with me, because he wasn't with me when I bought July, and I think he was a teensy bit mad about not being consulted about that. So today I asked him about getting another betta, and asked him to pick one out for me. He chose this beautiful dark blue betta, and named him Fidelity. (Don't ask me why, I have no idea). We actually also asked some cute kids at the store what to name him, but they suggested 'Shimmer', which got shot down by both myself and Adam. 'Shimmer' sounds like a girl's name.

Anyway. Long story short, now we have Fidelity! He was concerning me earlier with some wonky swimming, but I think (hope) he was just stressed. We'll see!

Sassy still seems completely unaware of the fish. Keep your fingers crossed for me! I could move one or both of the fish into the bedroom, where Sass is not allowed, but for now the tanks are on my kitchen island, where I can easily check on them throughout the day. And enjoy their beauty.

my kitchen island set-up
As you can see, both fish tanks are resting against the kitchen wall. July is in the pink-gravel extra-large brandy-snifter, and Fidelity is in the smaller Hagen betta tank. (Mine has a custom Buddha background that I printed out -  I somehow lost the original background. No matter - this way I can switch out the images. I think I need something lighter so that Fidelity shows up more clearly).

July clearly is living the high life in his/her almost two gallon tank. S/He also has a heater that I picked up last night in another local pet store called Country Pets & Ponds, a store that I liked. The staff was friendly, and they had a decent selection for the size of the store. (I would have gotten one of their beautiful bettas last night, but we were going to see a movie and couldn't leave the fish in the car, etc). July needs a heater because s/he is still a baby and requires warmer water. Apparently, all bettas should have tanks with heaters, but it's not necessary. I've been doing a lot of googling.

Both tanks have little homemade covers. One of the sites I was browsing suggested covers for several reasons: to keep the betta fish from jumping out, to keep the humidity high in the tank, and to help the fish stay calm. Neither tank has a cover, so I improvised. Fidelity just has a (temporary) stiff piece of photo paper over his tank, but July got decked out with a cardboard cover covered in polka-dot duct tape, with a space cut out for the heater. (I made it with made with leftover cardboard from an IKEA gift - I love recycling!).

The peace plant next to the tanks is to help prevent Sassy from realizing the fish are even there. She likes to perch on the chairs next to the island and peer over the top to see what we are doing. I don't want her to notice the fishies. I'm not very concerned about it, as she rarely ventures onto the island itself.

And... that is it.

7.19.2012

meet July

yes, s/he really is that tiny
The other day, while I was in Massachusetts, I went to a local Petco with my sister to ogle all the animals we wish we could have. That particular store had something I'd never seen before - baby Betta fish! I swooned. I love bettas, and I love babies, and it just seemed so perfect. The little fishies were so-o cute! I couldn't get one because how would I get it home? But I was determined to possess one.

So a few days ago, I went to a Petco nearish to my home in Missouri. I went "just to look", but I ended up leaving with a teenytiny fishy that I named July (I was given a betta as a wedding gift that I named January, but I couldn't move January to Missouri, so this is my replacement fish).

The extra-cool thing about this baby betta is that it is completely random. I love random things. I have no idea what color or type of betta I'm going to end up with. I could get a $20 male or a $3 female. Who knows! It adds excitement to my life. Also, July cost less than $2, so it's a good deal either way!

July is currently living in about a gallon of water in an extra-large brandy-snifter-type glass bowl on a pedestal. S/he has pink gravel and multi-colored plastic gems to keep his/her life colorful.

So far I've left the brandy bowl on my kitchen island, and Sassy has shown no interest in it. I think July is too small for her to notice. Hopefully it will remain that way!

wip: dresser

my workspace
I have been working diligently on my new dresser. So far I have sanded about 1/3 of it. Most of my time has been spent going to Lowe's and trying to rebuild the missing broken-off corners. When I bought it, I obviously didn't inspect it closely enough. But all these repairs give me something to do, I suppose. 
one finished corner

I have been using white wood filler to recreate the corners. It looks silly now, but it should look fine once I paint everything. I've been testing the new corners, and the wood filler seems pretty strongly attached. We'll see how durable it is. Adam has another idea for fixing these broken areas, but I'm not sure I want to invest in a hacksaw just yet. 

The real difficulty is not in the corners, but in these huge splintered areas along the bottom edges of the drawers. I am this close to deciding that I wouldn't mind a lived-in roughed-up look. After all, this dresser will just be used in my sewing room and (hopefully) used by little kiddos in the future.

We'll see! I just can't wait to get to the painting stage...

unfinished repairs
it almost matches
not so much


7.16.2012

new project

56x30x19inches
To keep busy for the remainder of the summer, I decided to acquire and paint a dresser to use in my sewing room. I found this one on Craigslist for a mere $45! I have grand plans for it.

It barely fit in my tiny car, but happily, I now have it sitting in my garage. I ran to Lowe's for supplies today, and have already started repairing broken drawers and sanding.

Stay tuned to see how it turns out!

completed: mother's quilt


front and back

Remember this super secret present quilt, the one I worked on for months and months? Well, it finally got presented as a birthday gift to the intended recipient - my lovely mother! Fortunately, she loved the quilt!
recipient and back of quilt

I scoured the Internet looking for an appropriate pattern for this quilt. The pattern had to include queen sizes and be modern yet traditional. The pattern that I ultimately settled on is The Loaded Sandwich by Frivolous Necessity. The pattern instructions were a little spare and are designed with honeybuns in mind, but with Adam's magical math skills, I made it work for me. 
me and my mother daring to sit on the quilt
My mother requested dark reds and light blues to match her bedroom, and Adam helped me pick out the seven fabrics (one patterned cream, two solid reds, two solid blues, one patterned red and one patterned blue) that I used. It took a long time and a lot of work to create all those striped squares, but I think the quilt came out beautifully. The back is the solid dark blue cut with an off-center strips of extra squares. I bound the quilt with light blue pre-made satin binding, because my mother loves satin bindings.
front and back

The almost-queen sized quilt fits perfectly on the double bed, and happily, the quilt colors match the decor in the room. The quilt is a tiny bit Fourth-of-July, but given that my mother's birthday is in July, I think it's acceptable.

all laid out on the bed

I stitched "Happy Birthday, 2011" on the binding. Sadly, I finished this quilt in 2012. Not quite sure what I was thinking there. I will be adding "2012" to the quilt... someday.

corner detail
I was told that this quilt looks "mature" and "handmade, not homemade". That's what I strive for, and I am so happy that the quilt will be well-loved!


back from vacay

sunset over the lake

I am back from my vacation to Massachusetts/New York!
I had a lovely time, but it is good to be home!
And now to return to crafting the pain away!

7.01.2012

completed: super secret present quilt

It's DONE. Be prepared to see the (awesome) final pictures after... Christmas.

Yep. I am a little bit ahead. The (only) bad thing about finishing presents so early is the delayed gratification. I have to wait months to give it to the recipient!