6.30.2012

wip: super secret present quilting update

sneaker quilting
I am officially so bored of quilting sneakers. I've been mixing it up with different shapes, both tracing and free-handing. I have found that it is possible to trace a paper cutout as well as cardboard stencils, but requires a lot more careful stitching, as it is much easier to accidentally sew over paper than cardboard. (If you do make such a mistake, don't worry. It is fairly easy to rip the offending paper or cardboard out of the stitches).

It takes a lot of 3x5 sneakers to fill at 95x75 quilt. It also takes a lot of thread. There is a reason quilters will tell you to fill a bunch of bobbins before getting started free-motion quilting - it is so easy to lose momentum when you run out of thread and have to stop to refill the bobbin. That loss of momentum is the reason I am blogging right now!


6.29.2012

new quilting technique!

quilted sneakers

For my current work in progress, I decided I wanted to do something different with the quilting and stretch myself beyond basic free-motion quilting styles such as stippling. I had several long conferences with Adam and my very creative mother, and ended up practicing quilting sneakers on some scrap quilt sandwiches. The WIP features a few sneaker prints (as you can see in the bottom left-hand corner in the photo above), so it seemed a fitting quilting pattern. I googled "sneaker outline", printed off two appropriate pictures, cut them out and then made cardboard stencils.

I've found two ways to quilt the sneakers (or any other shape your heart desires). The first is simply to trace the shape with a quilters' pencil, and then free-motion quilt over the pencil line. The second is even simpler: place the cardboard shape on the quilt, and hold it in place while free-motion quilting around it (being sure, of course, not to stitch on the cardboard). Easy peasy.

I am in love with the results - I go around each sneaker shape twice, so they are a little sketchy looking (and also to provide a little more stability to the quilt). The shapes I am using are about five inches long by three inches tall. On the actual quilt, I am placing them a few inches apart as opposed to being right next to each other, as they are on my black practice sandwiches.

So far, this technique seems to go pretty fast - although each sneaker shape takes a little bit of time to do precisely, the fact that I'm quilting so loosely makes the process go more quickly than any of the other quilting styles I've tried.

6.27.2012

completed: super secret present quilt top completed

still more scraps
Despite a multitude of cutting errors, sewing errors, kitten interference and general incompetence, I managed to finish the 95x75 super secret present quilt top this afternoon/evening. Huzzah huzzah.


No pictures of the finished product just yet...

wip: a super secret present quilt

scraps

more scraps

6.26.2012

completed: super secret present quilt

Well, it's really not very secret but it is super! This project has been on my to-do list for months and months, and I am so excited that it is completed!
I can't wait to give it to its intended recipient!

sneak peek

6.19.2012

evolution of quilters?

picture of Sassin on my ironing board
because a blog post isn't complete without a picture

I just read a really interesting post over at The Sometimes Crafter about the evolution of quilters. Basically, she talks about how we start out as newbies who just want to get the project done, evolve to intermediate quilters who begin to really hone their skills and work toward perfection, and the advanced quilters who know how to do everything, have all the tools, and create those amazing quilts we've all seen on the internet.

I think I am an intermediate quilter on this simple scale - I don't rush just to complete projects, but I don't always take those extra, time-consuming steps to make sure that all my seams match up and my projects are perfect. I definitely think I have progressed a lot from my early days (for instance, I used to tie quilts. The horror!), but I definitely still have a lot to learn. Some of that is improving my skills, but some of it is also changing a mindset.

It will be interesting to see how my quilts progress in the future!

completed: double-sided PhD tote bag

the calm side
the panic side

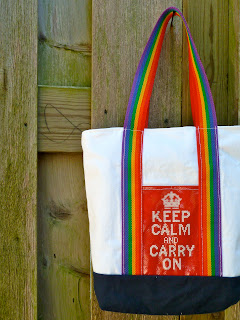
My younger sister starts graduate school in the fall, so I've prepared an all-purpose zippered tote bag for her to use for school. (Don't tell anyone, but this gift was supposed to be a birthday present months ago. I think it's more fitting as a graduate school gift, though). 

This project was truly a labor of love, between the doing the two cross-stitches and then making the bag itself, but it turned out totally worth all the work.


I used a bunch of tutorials for different parts of the bag - New Green Mama for the main idea of the bag, Projects by Jane for the recessed zippered top, and Sew Mama Sew for the interior slip and zippered pockets. And then I added my own twist to the whole thing, of course.


Each cross-stitch is also a lined pocket and I used iron-on vinyl to cover the cross-stitches (so that they are impervious to weather and wear), rainbow webbing for the straps, and a big red sport zipper to secure the top of the bag. Everything is double-stitched for durability and security. The bag has boxed corners and interfacing so that it will stand up on its own, and it is lined with a fun dinosaur print, with a two slip pockets on one side and a zippered pocket on the other side.

fully lined with dinosaurs!

I also made a coordinating pencil pouch out of the leftover white canvas, dinosaur fabric and rainbow webbing. The pouch is made using my 3DS case tutorial, just with different measurements. I filled the pencil pouch with mechanical pencils that are designed to look like regular pencils, extra lead, colored pens, fun erasers and a highlighter. I also tucked a notebook and matching folder into the bag so that my sister will have everything she needs (weil, some of it, anyway) to start school!

surprises inside
Overall, I love this bag. I was tempted to keep it. But I can always make another one!

looks good on me, right?

the cross-stitches

the back of the cross-stitches

6.18.2012

(finally) completed: quilt for me

the front
closeup of the front
the back
closeup of the back

About a week ago, I finally finally finished the quilt for me that has been sitting with the binding half-attached for months. I just machine stitched the binding on, and voila! The quilt was finally done.

It measures 41 x 56 inches, which is a nice lap size. I followed a quilt along by Obsessively Stitching, which made the process easypeasy.

I've definitely moved on from this type of quilt, but I still love the fabrics I chose, the loopdeloop quilting (complete with hidden hearts), and the pieced back. What a fun, happy quilt.


6.16.2012

new free-motion quilting designs

a few trial runs

Yesterday, while browsing the Internet for free-motion quilting inspiration, I stumbled across The Free-Motion Quilting Project. It's a pretty awesome website with hundreds of free-motion designs with accompanying photos and how-to videos. Fabulous!

I tried out a few designs, including this one (far left and middle) and this one (far right). I'm working on expanding the designs to be bigger, since I've decided I am not too fond of the texture that dense quilting creates. I also practice the designs on paper in addition to fabric, which I find helpful.

closeup

6.13.2012

scrabble with friends

scrabble board
making a move

Winner: Erin
Second Place: Adam
Third Place: Kristin
Last Place: Me

tie-dye fun


pink, lime green, and turquoise
rubber banded tshirts 
the workspace
all dyed up
it's so hard to keep sections white
applying the dye 
waiting 6 hours is the hardest part
the fabulous results on fabulous people

On Monday, two of my oldest friends came to visit me and Adam. Yesterday, we got pedicures, tie-dyed tshirts, cooked delicious foods and played Scrabble (which I predictably lost). It was awesome to see them, and we had so much fun!

These are pictures of our tie-dye adventures. I haven't tie-dyed anything since I was a little kid, so it was really fun and nostalgic. We did it on the drop cloth in the open garage, which worked out well. Rinsing the dye out of the shirts after the six hour waiting period was not so fun, but we took turns rinsing the six shirts we made (including one for Adam - I am currently taking bets on whether or not he'll ever wear it), and then I washed them in hot water in the washing machine. The colors came out a lot lighter than I expected - I think letting the dye sit longer would probably have resulted in more saturated colors. But overall, it was definitely a fun way to pass a few hours, and now we all have pretty souvenirs of their visit!

6.10.2012

completed: first real queen quilt


crazy cats and polka-dot binding
see adam?
all laid out
The 12+2 quilt is done done done! I am so excited!

This is my first real queen-sized quilt - I have made one queen quilt before (long ago, in the dark days we don't like to think about), but I didn't quilt it very much and I had a lot of help making the whole thing. So this is my first real queen quilt.

This quilt finished at 85 x 85 square, which makes it legitimately a queen. It features a bunch of fun prints, with an orange-on-orange polka dot binding. I free-motion quilted it with large stippling (which I think is actually meandering) in a green variegated thread. Very fun. The backing is also green, and the green stitching looks awesome on the back. I used low-loft 100% polyester batting for this quilt - never again. It was not fun to work with and shed all over my poor Enterprise. It's strictly 80/20 cotton/poly blends for me from now on.

The 12+2=Q quilt pattern that I used can be found at Oh Fransson! and was very easy to follow. The quilt top came together very quickly, and using a sheet for the backing meant I didn't have to piece a bunch of pieces of fabric together, which was nice.

This particular quilt will be given to someone special come Christmas! That's one thing off my Christmas to-do list! Huzzah!

6.08.2012

rescuing trash

pretty

Yesterday, I rescued a wine bottle and two Classico pasta sauce jars from the trash, and turned them into spray-painted and glittery vases. I also glittered a vase from the dollar store.

Glittering things is really easy - you just swirl Pledge floor polish around the inside of the container, pour the excess out and quickly pour glitter in and swirl it around until all the sides are coated. If the container has a lid, you can do all these steps with the lid on, which is much easier. The vase was a bit tricky, but I made it work.

I plan to spray-paint the pasta sauce jar lids silver as well, just in case I ever want the lids. In the meantime, I will probably make more white paper flowers to put in my new pretty vases!

loving the colors

6.07.2012

completed: colorful paper flowers

bouquet
Here is a second bouquet, very similar to the one I made this morning, only much more colorful! I used a stack of multi-colored tissue paper from the dollar store, and brightly colored chenille stems (also known as pipe cleaners) from the same esteemed store. This pretty bunch cost me only pennies, and look how cheerful it all looks!

closeup


completed: spray-painted trash

before

Somewhere on the Internet, I saw a spray-painted wine bottle. And I was determined to recreate it. Somewhere else on the Internet, I saw rubber bands used when spray-painting jars and such to create lines. I was determined to do that too.
So today, I rescued a wine bottle from the trash, cleaned it out throughly (getting labels off is a pain!), wrapped rubber bands around it haphazardly, and spray-painted it white. Ta-da! A totally free project!
This technique would also be fun with multiple coats of spray-paint in different colors!


after

I did find that there was a little bleeding under the rubber bands, especially where the bands crossed, and that when I took the rubber bands off, there were little ridges of excess paint on the bottle. These undesirable additions to my pretty bottle were easily removed with a little brushing action.

completed: paper flowers

flowers

in a new orange mason jar

To fill all the mason jars that I've been making, I made paper flowers. Paper flowers aren't quite as lovely as fresh flowers (and are considerably more work), but they won't wilt and don't need water. And since I constructed a whole bouquet for a few dollars (with the supplies to make many many more leftover), I would say paper flowers are also quite a bit less expensive.

I constructed these lovelies out of tissue paper and chenille stems. The "flowers" are colored around the edges with marker to look a little more realistic (and pretty). I did four pink flowers and two red flowers.  To make the flowers, I followed this tutorial, which was very helpful. 

The fake carnations remind me dyeing carnations with food coloring with my mother back in the day. Good times, good times.

top view

closeup

pretty

completed: more tinted mason jars


the good ones

the rejects

Last night I made more tinted mason jars after removing the previous not-so-successful coloring from two jars. Out of the six I made, four were successful and two were not. That's not an ideal success rate, but since it's pretty easy to remove the tinting (see my previous post for details), it's acceptable.

I used the same mixture and oven temperature as before but added more food coloring for more intense colors. I did four drops of red for the pink, four drops of red and three drops of blue for the purple, three drops of green and three drops of blue for the teal (both of them - the successful one and the reject), and three drops of yellow and two drops of red for the orange. The darker teal reject was four drops of green and four drops of blue.

I've thought long and hard about why two of the jars didn't work out. One of them was the exact same mixture as a successful jar, I used the same techniques on all the jars, and the jars were all in the oven for the same amount of time. I've concluded that the air-drying time is crucial. The two unsuccessful jars were the last to be done, and thus had the least amount of air-drying before going into the oven. Next time (oh yes, I will continue until I perfect this process), I will let all the jars air-dry for 30 minutes before going into the oven for 30 minutes.

For now, I am going to make something to put in the jars.

top view

side view

so pretty!

bottom view

the rejects - so streaky!