Showing posts with label fabric. Show all posts

10.17.2013

[completed] burlap lamp housewarming gift


Remember this burlap that I hand-dyed a long time ago? I finally used it - somehow all my work-in-progress projects are getting attention now. I used the yards and yards of dyed burlap to make another burlap lampshade. This time, I made one for my younger sister and her husband as a housewarming gift (they are moving in November).

I did dye this burlap especially for them and for this project. She had requested a lampshade in a peachy orange color. Hopefully this won't disappoint! 


And of course, what good would a lampshade be without a coordinating lamp base? I found a hideous brass lamp at Goodwill awhile back, and after scuffing it up a bit with a block of sandpaper, I spray-painted it a metallic cappucino color. (It's gorgeous in person). 


Even Gandalf the Cat likes the result!


9.04.2013

fabric stack


blue fabric stack

Last night, I decided to play around with my fabrics and pull out a stack. This stack of ten fabrics was the result! I love the colors. I have varying amounts of each of these fabrics, but certainly enough for a project. Maybe a new quilt is in the works? I haven't decided on a pattern, though. I'm not sure what these fabrics are calling for...

Gandalf approved fabrics and book

8.18.2013

[wip] one block down... 15 to go

completed 20x20" block
This is my first completed block for my sister's white quilt. I'm loving how this block turned out. The white-on-white fabrics stand out from each other, and the cream background fabric (Kona Bone) allows the white fabrics to pop. I chose Kona Bone rather than Kona White or Snow because I wanted to ensure that the white piecing (and all the work I did!) is discernible from the background fabric.

I completed this block yesterday, and then prepped a few others. It seems to be faster to do a bit of an assembly-line type production rather than see each block through from start to finish. 

The block turned out smaller than the pattern says it should - oops? I'm not sure how that happened, because the block is evenly 20x20", but as long as my blocks are all consistent, it shouldn't really matter.

I'm super excited about this project. I think it is turning out to be a lovely low-volume quilt, which is all the rage right now. 

Once again, I'm using Cluck Cluck Sew's Wallflowers pattern.

8.17.2013

[completed] thread catchall

Untitled by craftthepainaway


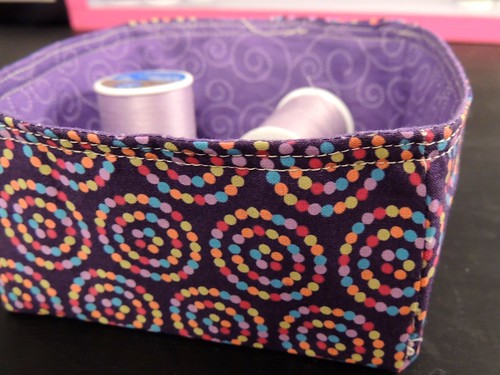
I just completed a mini thread basket/bin/catchall! I followed a tutorial by The Sometimes Crafter. For this catchall I shrank the proportions a bit - I made the starting block 10x10" (rather than 15x15)" and cut out 2.5"corner squares rather than the suggested 4.5". (I actually made another basket following the exact instructions, but it turned out bigger (and not as well constructed) than I wanted.

This basket will be used to collect all those random bits of thread that always seem to magically appear during a sewing project. (Even though Enterprise has a marvelous thread cutting feature, little scraps of thread seem to be everywhere in my life).

[wip] it's a white christmas

cutting board, zebra rotary cutter, and scraps

My current work-in-progress is a request from my big sister. She asked for a queen size white quilt for this Christmas. I've started it already because Christmas is notorious for sneaking up on me, and I plan to give quite a few handmade presents again this year.

So I've been cutting yards and yards of fabric on my fabulous new island, and today I've been stitching, cutting, pressing, and stitching some more while watching reruns of The Great Food Truck Race.

This is going to be a long project - each quilt block contains about a bazillion pieces, and is a multi-step process. I'm following Cluck Cluck Sew's fabulous Wallflowers quilt pattern. My version of the quilt will be a lot quieter, with very subtle differences between each fabric. But I think it will be beautiful! I can't wait to see it come together.

Although I am so not excited to quilt another queen-sized beast!

can you tell this is scraps from 16 different fabrics?

8.07.2013

[completed] mother-in-law improv quilt wallhanging

my first improv quilt
This gift was actually completed back in May, for a June birthday, but was delivered in August. Oops.
This quilt wallhanging was made for my lovely mother-in-law. She had a bunch of my brother-in-law's artwork from school printed onto fabric, and I turned these amazing prints into a quilt!
I decided to do a modern improv quilt because the artwork was so abstract. I arranged the prints on my floor, and cut random strips of coordinating solids. I stitched and trimmed and stitched and rearranged and trimmed and stitched until I achieved the look I wanted. Adam was a big help during this process - which was great! He even helped pick out the solids I used (all from my stash!).

The back of the quilt features one print that didn't quite make it onto the quilt front, and black, blue and red solids. You can see the quilting pretty clearly on the back - I did a few stitched squares around each print. Since this is a wallhanging, the quilting didn't need to be dense.

back of the quilt

I finished the quilt off with black binding (Adam's idea) and stitched a hanging sleeve on the back of the quilt (not pictured).

In the end I think the quilt came out pretty much how I had hoped. It was just received, and my mother-in-law said she loves it! I'm so glad. This quilt was out of my comfort zone, but I think it was a good stretch for me.

7.21.2013

[100 day city sampler quilt challenge] day zero


+


=
my new quilty life challenge!

Let me explain. I've been feeling pretty down lately, what with my new job being stressful (as new jobs often are) and leaving little time for crafting. It's gotten pretty bad here lately. I've browsing quilt books and blogs, and I found this Tula Pink City Sampler book quilt-along. I kind of fell in love with the whole concept of 100 different blocks. 

Today I took a little (haha) drive to the nearest Barnes & Noble (which is over an hour away) to find a copy of the Tula Pink City Sampler book (see above!). I spent some time browsing all the beautiful quilt books there, and reluctantly left with just the Tula Pink book. Then I went over to the nearby Jo-Ann's and picked out a stack of rainbow fat quarters (see above!) with which to make the 100 blocks contained in the (really pretty) book. 

So here's the challenge: I am going to make at least one block per day, going in the order they are presented in the book. In approximately 100 days, I will (hopefully) have the blocks completed and will be able to start assembling the quilt.

My goal is to have grace for myself if I miss a day, but to have this project to keep me going and looking forward. I'm in love with my rainbow fabrics, and the whole idea. I am excited to see this quilt come together over the new few months!

6.05.2013

[completed] banker chair for the sewing room

before & after!


before (picture posted on craigslist)
I eyed this banker's chair on craigslist for over a week, and I finally went on a (long) driving adventure to collect it. An hour and $25 later, and this baby was mine.

during (picture on our kitchen floor)
I disassembled the chair without any help aside from advice from my mother over Skype. Taking apart the chair involved a lot of manual labor, surprisingly - I had to wrestle the padded sections of the arms off the wooden base, pull the wheels off, etc, and the chair is pretty heavy.

after (picture taken in the sewing room)
 But a few cans of spray-paint, some polka-dotted fabric and some coordinating gray fabric and a lot of patience, and this chair was transformed! I used Krylon's "Satin Nickel" spray-paint for the chair, and covered it in a clear protective coat as well. I found the gray polka-dot fabric at Jo-Ann's for only $2.49 a yard, and found the matching gray used for the arms as a remnant. I made piping out of a package of light gray single fold bias tape to go along the arms. I like the effect of the piping, although it's pretty subtle.


It's decidedly not perfect - there are imperfections in the chair, imperfections in my spray-painting, and the re-upholestery isn't perfect either.


But I LOVE my new chair! And I am so proud of myself for doing it all alone!

And if I ever get bored of how it looks, I can easily change it.

5.23.2013

dyeing burlap


orange-pink burlap!
After completing my pink burlap lampshade, my darling sister requested a similar lampshade, only in the orange-to-pink color family. Of course, burlap does not come in any such shade, which meant only one thing: it was time to dye some burlap!
I did some quick searching to make sure that burlap will take dye - which it will, since it is 100% jute, a natural fiber - and then stumbled upon Rit's amazing color guide. Seriously. It's amazing. It has a whole section called "Yellow-Orange-Peach". Perfect!
Intentionally I wanted to a color (#79, if you're curious) out of the "Orange" section. My impatient self wasn't willing to drive all the way to Jo-Ann, so I checked out the Rit dyes at my local Wal-Mart. No cherry red or golden yellow - the only two colors I needed. So I whipped out my phone and checked all the orange-pink colors to see if any of them were a) an acceptable shade, and b) used only colors available to me. Luckily, I found #464, which requires scarlet and sunshine orange, two colors that the Wal-Mart carried. So I grabbed the dye, four yards (yes, four - just to be safe) of natural burlap, and a large plastic bucket.
dye bath
Today, in between bouts of furious packing, I dyed the burlap. That was my "fun" activity for the day. I washed the burlap in warm water, and then I set up the dye bath about 12 quarts of hot hot water, and two tablespoons each of the scarlet and sunshine orange liquid dye. I put the damp fabric into the bath and let it sit for about 45 minutes, swirling the water around frequently. I couldn't stir the fabric because there was simply too much and it was too heavy for my stirrer (an old paint stick) to maneuver around. But as far as I can tell, the burlap took the dye evenly. Then I rinsed the burlap out - which was easy, because it held onto the dye so fiercely - and ran it through a cold water cycle in the washing machine before drying it on a normal setting.

And voila:

gorgeous, right?
 I am SO pleased. It's exactly the color I wanted. Burlap sheds normally, but washing and drying it made it superduper fuzzy, though. Just a warning to anyone who tries this. I have no regrets, though - the end product is worth a little extra vacuuming.

I can't wait to make the lampshade. Sadly, that project might have to wait until I'm situated in the new house. And I still need to figure out what lamp base I'm going to use...

5.21.2013

[completed] pink burlap lamp

Remember this free lamp that I spray-painted black? Well, I've been on the hunt for the perfect lamp shade for it ever since. I tried numerous shades, found ones that I love (but didn't work with the spider style hardware), and ended up returning them all. I found this one (below) at Lowe's, and decided that I liked the shape but not the color. It's a linen color - pretty (but boring) when the light is off, but very tan when the light is one.

untouched lamp shade
So I did a little googling, and found this (very minimal) tutorial, and was instantly inspired. Gorgeous, right? But I still wasn't eager to have a beige lamp. So I decided to check out the burlap selection in Jo-Ann. And lo and behold, I found pink!

I present to you: my new pink burlap ruffled lamp shade!

recovered lamp shade
 I followed the tutorial's basic concepts, but tweaked the process to suit me better. I cut 2" strips of the one yard length of burlap, folded the strips in half, pressed, and then glued the strips onto the lampshade. I only cut the burlap strips when I reached an edge - pre-cutting them didn't work for me because the length I need depended on how I glued down the strip. I would take the small sections left over to fill in the little nooks and crannies between strips. I didn't make the strips all go in the same direction or wave, which I liked. Although I think it would be pretty even if they were all going in the same wave shape.

lit lamp
 Isn't it pretty? It took few hours, but not as many as you'd think. I did it over the course of one evening and an hour or so the next day. I did burn my fingers on my glue gun, but I think it's worth it!

oops
Sadly, one yard of burlap wasn't quite enough. I will have to get some more and fill in this section soon!

This lamp will soon be gracing my new sewing room in my new house!

5.19.2013

[completed] framed fabric jewelry display

diy framed fabric jewelry holder
 Yesterday, for no apparent reason, I became convinced that I needed to make a jewelry holder/hanger. I spent some time googling DIY tutorials and images, and finally was inspired by this framed cork jewelry organizer. So I went over to my local Wal-Mart to pick up some supplies to make my own!

I easily found a 20x24 frame, some gray faux-suede fabric, and black pushpins, but couldn't find any cork. So I wandered around, and then settled on using two 20"x30" craft foam boards instead. It was a gamble, but it was low investment and it paid off!

Assembly was easy. I took the back and the plastic "glass" off the frame and cut my foam boards down to 24" in length (they were already 20" wide, which was perfect). I taped the foam boards together, and then covered them with the faux-suede fabric. I ended up just taping the fabric to the boards. I'd prefer to staple, but I don't have an industrial stapler yet. And glue was too risky - it's difficult to readjust with glue. And I needed to pull the fabric taut again after I stuck the fabric-covered boards in the frame.

Then I forcibly pushed the frame back on, and taped it down for extra security. The back didn't fit very well because of the thickness of the boards and the fabric, but it worked with a little encouragement.

Then I simply stuck the pushpins through the fabric into the boards, and hung my necklaces off of them. Easy, pretty, and organized.

So a quick recap:

Materials:
1 20x24 frame - 14.97
2 20x30 foam boards - 3.00
1 yard of faux-suede fabric - 1.00

Total cost: 18.97 for a fabulous (and large) new jewelry organizer!


a sense of scale

5.14.2013

[wip] giraffe shirt

cutting cute giraffe fabric
featuring a scented sachet as a pattern weight
Today, in between running errands and being super productive, I decided to make another top using the same pattern as my last one. When I learn something new, I like to practice those skills multiple times to solidify the knowledge in my mind. Practice makes... better memories?

Anyhow, isn't this giraffe fabric just the cutest? I'm pairing it with a matching turquoise solid for the yoke.

5.08.2013

[completed] "mod garland" quilt

Remember doorway garlands like this?

mod doorway garland example
Well, I made a quilt top inspired by these mod garlands:


The quilt top is made from five fat quarters and a coordinating green solid along with some teal blue solid fabric from my stash. The quilt top measures about 37 x 45, which is significantly smaller than I had anticipated. But it's cute and cheerful!


5.03.2013

second i-spy swap fabrics

pretty stacks

all sorted

all 10 fabrics were from my stash!

4.23.2013

[wip] sneak peek of a super secret present

As much as I love love love giving handmade gifts, I almost hate working on super secret presents because I can't share the projects until they are done and received! I mailed off one present this week, and I've been working on another. I'll just share this little sneak peek.
trying to match up colors and corners
This present is an improvisational quilt, a type of quilt piecing I've never done before. It's harder than it looks! There was a lot of cutting and adding and cutting and trimming and all sorts of things. Usually my quilts are carefully planned out (and this usually works for me, please disregard the houses on a hill quilt!), but this project called for something a little more spontaneous. The quilt top is almost done, but it's not due for ages, so don't get too excited. I am just trying to finish some presents before we move and everything is chaotic/messy/needing to be unpacked for awhile.

4.12.2013

[completed] scented sachets

scented sachets
Over the past few nights, in between furious paper-writing, I made six scented sachets following this Purl Bee pattern. I love them! I used three colors of felt - pale pink, hot pink and a pink-and-white polka dot. The sachets are backed in a scrap of some pink cotton fabric, and are filled with flaxseeds and either dried lavender or peppermint. They smell divine!

In the process of making these, I finally mastered the invisible ladder stitch. Huzzah!

I've stashed these sachets in all my drawers of fabric to make everything smell extra-nice!

so pretty!

2.07.2013

tiny colorful scrap squares

piles of 2.5inch squares
 Yesterday, I decided I wanted to make another scrap quilt. I've been determined to use up my stash, and the scrap bin was still overflowing (despite making a scrap quilt already). I wavered for a long time between making a granny squares quilt or a modern scrap baby quilt. Then I realized that both quilt patterns require 2.5inch squares, so I set aside my internal disagreement about which pattern to follow and started cutting up scraps. As you can see, I have a rainbow assortment. Each color pile has at least four different prints in it, and the stacks are surprisingly tall.
so cute
I've been playing around with different arrangements of the fabrics, and I think I will start off trying to make a boy granny square quilt, using my superhero and novelty fabrics as the centers of the granny squares with rings of bright non-pink colors. But I can't decide what I want the background fabric to be - grey? I think that would work best (the only white I have is a floral tone-on-tone print, which doesn't suit this concept). I also have tone-on-tone black prints, but that might make the whole thing too jarring. So I think grey would be best - and I have enough in my stash. I am just loath to use it because I don't want to have to buy more for another quilt!

That's the drawback of only wanting to use your stash... I recommend stocking up on basic neutrals before deciding to rely on the stash alone!

1.20.2013

[wip] scrap arkansas crossroads quilt

I've been working on a few projects here and there lately, trying to reduce my WIP pile, but nothing has been really grabbing my interest. I've been seeing a lot of scrap quilts around the blogosphere, so I started researching scrap quilt patterns. I found a few favorites, but ultimately gravitated towards the Arkansas Crossroads pattern because it was fun, looked complex but is actually easy to complete, and would use up a lot of my smaller scraps.

scrap quilt top so far

I spent the last few days sorting scraps, cutting colored scraps into 3.5 inch squares and my white scraps into 6.5 inch squares, and stitching it all together. I have way more colored scraps than I used in this quilt top - I decided to go for a calm, blue-black-brown-gray palette. These blocks go together pretty quickly, and I think I will make another one of these quilts with my more vibrant scrap fabrics.

The picture above is nine 12.5 inch square blocks carefully arranged to compose the Xs and star shapes. I have run out of white scraps, but I have quite a few little colored squares leftover, so I might cut into my stash of white fabric to make the quilt top bigger. I want to keep it a child-friendly size, since I plan on donating this quilt, but it's currently only about 36 x 36 inches. I am also considering adding a border (or two) to make the quilt bigger, but can't settle on what fabric to use for that. So for now, the quilt top is going to stay like this, I guess!

Any suggestions for how to finish this quilt are welcome!

1.14.2013

[completed] two more two-zip hipster bags

For two of my closest friends, I decided to make two more of the two-zip hipster bag that I had made for my cousin. Like my cousin's bag, these two cross-body bags feature adjustable straps, an outside slip pocket, a zippered outside pocket, and interior slip pockets.

For my old friend Erin, I chose a purple and white striped fabric with dark purple zippers. I chose a solid lavender for the lining.
front of Erin's bag

inside of Erin' bag
back of Erin' bag
 For Jess, I chose to use three fabrics - a solid Kona green, a green white and black print fabric for the outside pocket, and a fun green owl print for the lining. I chose black zippers to contrast with the fabrics.
front of Jess' bag
inside of Jess' bag
outside pocket on Jess' bag

finished bag!
I had a lot of fun making these bags (especially utilizing all fabrics from my stash), and both bags were very well received!

[completed] brother-in-law sneaker quilt

front of the quilt

This quilt for my brother-in-law is one of my favorite Christmas presents this year. I finished it months before Christmas (which is always nice). I bought the fabric for this quilt at the same time that I got the fabric for Adam's anniversary quilt. 

look at those awesome prints!
My brother-in-law loves sneakers, so I had to get this bundle of fabrics that featured fabulous sneaker prints, music notes, cassette tapes and bright solid colors. I matched the bundle of fat quarters with some cut-up black cotton Ikea sheets, and used this tutorial from Oh Fransson! for the pattern. The pattern makes a queen-sized quilt (like this one), but I adjusted the pattern to make a large twin/lap size since I intended the quilt to be used in his man-cave rather than his bedroom. Doesn't it make for a fun man-cave quilt for a 13-year-old?

quilted ps3 controller and sneakers
To make the quilt even more special and fun, I quilted sneakers, video game controllers, headphones, music notes, and various other designs using this technique. Basically, I took cardboard or paper templates, pinned or just laid them on the quilt, and then free-motion quilted around the design. This was initially a pretty slow process, but I got faster and more creative with practice.

quilted initials and sneakers
All the quilting was done in grey thread (the same as in Adam's anniversary quilt), so that the painstakingly quilted designs would show up nicely on the front and back of the quilt.
back of the quilt
 This was my first time using Ikea sheets, and while the sheets were a pain to cut, the fabric worked well for both the front and back and the quilt (and was pretty cost-effective). I have another set (also black) just waiting for inspiration to strike. I got the idea of using sheets from the Oh Fransson! tutorial, and I'm loving the whole idea. (You might have noticed that I also used a sheet for the backing of Adam's anniversary quilt).

closeup of the backing
The grey thread pops against the black backing, while not being too obtrusive.
binding
I bound the quilt with a scraps from the prints on the front and a light lime-y green solid. It turned out pretty well.

I had fun making this quilt and learning a new way to quilt in the process. And my brother-in-law loved the quilt - which is ultimately the most important thing!
smiley face and wonky star