Showing posts with label tutorial. Show all posts

9.29.2013

[completed] easy-peasy diy craft show cards

diy craft cards
So I have signed up for a craft show in November. I'm a little nervous about it, but I have a month to prepare. I plan on selling my Aragon bags, some quilts, small zippered pouches and maybe other small items such as matching lanyards. I also plan to have a sign detailing pricing and options for custom quilts and bags to maybe get some commissioned work.

So here are the steps I took to make some easy-peasy DIY craft show cards.

1. Locate a business card template (I used the modern business card template in Pages).
2. Choose cool fonts for your information (I used "fabric" and "always forever" from dafont.com)
3. Print out on pre-punched Avery business card stock.
4. Stamp some fun word on the back of the cards (I used an "enjoy." stamp and black ink).
5. Punch the cards out.
6. Enjoy!

stamped back

8.17.2013

[completed] thread catchall

Untitled by craftthepainaway


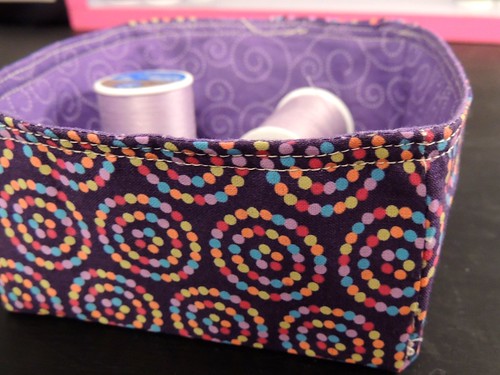
I just completed a mini thread basket/bin/catchall! I followed a tutorial by The Sometimes Crafter. For this catchall I shrank the proportions a bit - I made the starting block 10x10" (rather than 15x15)" and cut out 2.5"corner squares rather than the suggested 4.5". (I actually made another basket following the exact instructions, but it turned out bigger (and not as well constructed) than I wanted.

This basket will be used to collect all those random bits of thread that always seem to magically appear during a sewing project. (Even though Enterprise has a marvelous thread cutting feature, little scraps of thread seem to be everywhere in my life).

5.19.2013

[completed] framed fabric jewelry display

diy framed fabric jewelry holder
 Yesterday, for no apparent reason, I became convinced that I needed to make a jewelry holder/hanger. I spent some time googling DIY tutorials and images, and finally was inspired by this framed cork jewelry organizer. So I went over to my local Wal-Mart to pick up some supplies to make my own!

I easily found a 20x24 frame, some gray faux-suede fabric, and black pushpins, but couldn't find any cork. So I wandered around, and then settled on using two 20"x30" craft foam boards instead. It was a gamble, but it was low investment and it paid off!

Assembly was easy. I took the back and the plastic "glass" off the frame and cut my foam boards down to 24" in length (they were already 20" wide, which was perfect). I taped the foam boards together, and then covered them with the faux-suede fabric. I ended up just taping the fabric to the boards. I'd prefer to staple, but I don't have an industrial stapler yet. And glue was too risky - it's difficult to readjust with glue. And I needed to pull the fabric taut again after I stuck the fabric-covered boards in the frame.

Then I forcibly pushed the frame back on, and taped it down for extra security. The back didn't fit very well because of the thickness of the boards and the fabric, but it worked with a little encouragement.

Then I simply stuck the pushpins through the fabric into the boards, and hung my necklaces off of them. Easy, pretty, and organized.

So a quick recap:

Materials:
1 20x24 frame - 14.97
2 20x30 foam boards - 3.00
1 yard of faux-suede fabric - 1.00

Total cost: 18.97 for a fabulous (and large) new jewelry organizer!


a sense of scale

2.10.2013

[wip] superhero granny square quilt


Today I decided to turn some of my colorful scrap squares into something real. So I stitched together a piece of Spiderman and some red, yellow and black squares into a granny square block, following this tutorial.


This is the result!

This is my first time working with so many tiny pieces (the squares finish at a mere 2 inches). It's honestly a bit tedious, but I like the result. I haven't decided how many of these granny squares I'm going to make, but I have lots of scrap squares!


2.07.2013

tiny colorful scrap squares

piles of 2.5inch squares
 Yesterday, I decided I wanted to make another scrap quilt. I've been determined to use up my stash, and the scrap bin was still overflowing (despite making a scrap quilt already). I wavered for a long time between making a granny squares quilt or a modern scrap baby quilt. Then I realized that both quilt patterns require 2.5inch squares, so I set aside my internal disagreement about which pattern to follow and started cutting up scraps. As you can see, I have a rainbow assortment. Each color pile has at least four different prints in it, and the stacks are surprisingly tall.
so cute
I've been playing around with different arrangements of the fabrics, and I think I will start off trying to make a boy granny square quilt, using my superhero and novelty fabrics as the centers of the granny squares with rings of bright non-pink colors. But I can't decide what I want the background fabric to be - grey? I think that would work best (the only white I have is a floral tone-on-tone print, which doesn't suit this concept). I also have tone-on-tone black prints, but that might make the whole thing too jarring. So I think grey would be best - and I have enough in my stash. I am just loath to use it because I don't want to have to buy more for another quilt!

That's the drawback of only wanting to use your stash... I recommend stocking up on basic neutrals before deciding to rely on the stash alone!

1.28.2013

[completed] owl always love you

finished quilt!
For my younger sister's 24th birthday (can you believe it?), I made her a quilt. I was a little late getting it to her, but better late than never, right?

The idea for this quilt came about when I showed her the two snail baby quilts I made over the summer. She loved them and requested a birthday quilt from Boo Davis' awesome book. I showed her the options over Skype (which is basically the best invention ever!), and she chose the owl pattern shown on the cover. Through conversation, we decided that a snowy owl on a dark background would be neat.

This is the result!
closeup of the front
I took some artistic liberties and incorporated a range of white-on-white prints as well as one gray print for the owl's body and eyes. My sister did not like Boo Davis' mixing of prints, but I think a variety of prints helps give the quilt some depth and interest, so I chose to go with the more subtle white-on-white prints as a compromise. I added the gray print just to give the quilt a little more of a scrappy feel. I chose a rich dark purple solid as the background.

The quilt top came together surprisingly quickly, given all the many pieces. I had a lot of fun piecing it and watching the blocky owl shape emerge from the piles of carefully labeled strips of fabric.

quilt detail in the owl's head
I am really happy with how I chose to quilt this project. I stitched in the ditch around all the edges of the owl to begin with, and then filled in the owl's face and body with straight lines. Then in the owl's head, I quilted a herringbone pattern to suggest feathers. It took approximately forever, and my quilting got less precise as I went along. For the body, I just quilted the straight lines - I decided the herringbone "feathers" were more important in the owl's head, and continuing the pattern in the body would be too busy and too time-consuming.


So after I finished all my straight lines and herringbone quilting, I got to the fun part: the purple background. I decided to free-motion quilt stars, so that it would look like the owl was sitting against a starry night sky. I practiced the stars (inspired by this tutorial) in both white and purple thread, and decided I vastly preferred the stars in purple thread. The white would have made more literal sense, but would have dominated the quilt and I really wanted the owl to be the focus. So I quilted hundreds of stars in purple thread on the purple background. For the "whites" of the owl's eyes, I used stippling. I wanted the eyes to be different than the background, but also soft and not densely quilted.

The technique I used was pretty easy - I just created a star shape and then echo-quilted around it a few times before branching off and creating a new star shape. There were a few instances when I sort of forgot how to draw a star, especially when I was doing it at a weird angle, and so there are a few wonky stars. But since there are so many stars and no one star stands out, it doesn't much matter if a few are odd.
super wonky star
I backed the quilt in a super soft navy blue flannel. The white stitching of the owl's head and body stands out really clearly on the back of the quilt - so no matter which side is showing, the owl is present. There were about a million little threads to clip on the back, due to all the stopping and starting I had to do when straight-line quilting. Hopefully I got them all!
owl ghost on back of the quilt
The stars show up on the back of the quilt as well, but are not obvious. The purple blends nicely with the navy blue, and the texture created by the star shapes feels great with the flannel.

quilting on the back
The only thing I don't love about the quilting is how dense it all turned out. The quilt is still soft, but it isn't as pliable as some others I have quilted. I don't mind a slightly stiffer quilt, but I hope this one softens up a bit as it is washed and used.


I bound the quilt in a homemade navy and white striped binding. I chose the striped fabric because it coordinated nicely with the back of the quilt and the white owl, and it added a little visual interest. Once again, the binding was my nemesis on this quilt. Due to the inconsistencies of cutting, piecing, pressing and binding, the stripes got a little warped (as you can probably see above). I still love the striped binding - and overall I had an easier time attaching the binding to this quilt than I usually do - but it isn't perfect.

look at that tail twitch possessively!
sassy is going to miss this quilt!
I am happy to report that the quilt was well received!

11.03.2012

[today I learned] half-rectangle triangles

Today I learned to make half-rectangle triangles! I followed this tutorial (which I've read about a hundred times). It is surprisingly easy, except for the tricky bit where you have to hold pieces together strangely. But that could be easily solved with pins (I just don't do pins). So far, I've made like 24 half-rectangle triangles. The process makes two at once, so it goes pretty fast.

I'll be sharing more about this project in the future, but for now it's a secret!

10.21.2012

[completed] rainbow hexagon coaster

sassy being a goofball
So I have been crafting lately - I just haven't been documenting the things I made! Here's a mini-post with one of my recent finishes!


hexagon coaster!

I recently made a rainbow hexagon coaster, following this tutorial. It was surprisingly easy and fast to finish. I love it! I am super proud of a my rainbow hexagon coaster, especially because it was made entirely out of scraps!

closeup
coaster in action
It's almost - almost - too pretty to use.

9.18.2012

[completed] secret pal puncushion

mason jar pincushion

 Sorry I haven't blogged lately. I've been doing lots of crafting, believe it or not, but I have been making things (little bags, placemats, etc) for the craft fair I participated in last Saturday. I even sold a quilt there!

Today, I made a quick craft for a secret pal swap I'm in. My secret pal also likes to sew, so I whipped up a little mason jar pincushion, complete with pearly pins, for her. I roughly followed this tutorial from Prudent Baby, but it's easy to figure out how to do on your own. Basically I just cut out a piece of scrap fabric to be a bit bigger than the canning lid, stuffed it full of poly-fil fiberfill, and hotglued the fabric to the bottom of the lid. Then I put a little circle of cardstock over the bottom of the lid to hide those fabric edges, and voila! A pincushion that stores pins!


I used Ball Half-Pint Wide Mouth mason jars for my pincushion because I liked the squat shape and the  fact that wide mouth made for a bigger pincushion. The whole project only cost a few dollars - the pretty pins were around three dollars, and a set of four jars was around six dollars. I already had the scraps of fabric and fiberfill.


I plan to make three more of these pincushions for various folks, since I have three more jars. Maybe I'll even keep one for myself!

9.03.2012

[tutorial] easy lined pocketed skirt


Today I am going to show you how to make this skirt - a lined gathered skirt with an elastic waist and pockets!


NB: The numbered steps correspond to the numbered pictures. Not every step has a picture, but it's pretty easy to figure out!

1. Gather supplies. 
For a 19inch long skirt with a 0-42inch waist, you will need:
1 1/2 yard main fabric
1 yard lining fabric
1inch elastic equal to your waist minus 1 inch

2. Cut fabric!
You will need to measure your waist (or hips, or wherever you want the skirt to sit).
Take that measurement, and cut two waist width x 23 inch rectangles out of your main skirt fabric. (This is easily accomplished by laying the fabric folded selvage-to-selvage and cutting 23 inch rectangles across the width of the fabric, and then subcutting those 23 inch by selvage-to-selvage (roughly 44) into 23 inch by your waist size rectangles.
Cut the lining fabric into 22 inch by your waist size rectangles. 
(This is easily accomplished by laying the fabric folded with the fold lined up with a line on your cutting board, and cutting a selvage-to-selvage by your waist width rectangle. Then subcut that rectangle into two 22 inch rectangles).

3. Cut 4 pocket shapes out of the main fabric. (I used the pattern by See Kate Sew but you can draw your own pocket in any size you want).
You will also need to cut your elastic to your waist width minus one inch.

Sew side seams (the 22inch side) of lining fabric right-sides-together with a 1/4inch seam allowance.
You should end up with a giant rectangular tube of fabric. Like a skirt, but huge and unfashionable.

5. Sew the pocket shapes to the 23inch sides of your main fabric 2 inches from the top of the fabric with right sides together.

6. Press the pockets outward away from the fabric.

7. Topstitch the pockets in place with a 1/8inch seam allowance.

8. Sew up the side seams of the main fabric right-sides-together and sew around the pockets with a 1/4inch seam allowance. 
You should be making a straight line down two inches, then around the pocket shape, then straight down the rest of the side seam.
You should end up with another huge rectangular tube, but with pockets!

9. Attach the sewn lining to the sewn main fabric by placing the the main fabric inside the lining with the wrong sides together.
Match the side seams.
The lining fabric will be shorter than the main fabric. Line up the top of the lining fabric rectangular tube with the top of the main fabric rectangular tube.
Sew around the top with a 1/4inch seam allowance. 
(This will attach the lining to the main fabric with the seams nicely captured inside._

Fold over the top of the now-attached lining and main fabric 1/4inch (so just about that line you just sewed up!).
Press.

Fold over again 1 1/4inch (if you are using 1" wide elastic. If not, use the measurement of your elastic plus 1/4inch).
Press.

Topstitch along the bottom edge of your folded-over top.
Leave a 3inch gap near one of the seams.

Fold over the hem (so the bottom edge, not the one you just sewed!) 1/2inch.
Press.

Fold again 1 1/4inch.

Topstitch along the top edge of the folded-over hem.
Topstitch again 1/4inch from the line you just sewed.

Thread the elastic through the top of the skirt.
Attach a safety pin to one end of the elastic. Close the safety pin and thread through the tube you created at the top of the skirt. Hold onto the other end of the elastic so it doesn't disappear into the skirt also! 
Once the elastic is threaded through, sew the ends of the elastic together. Stitch up the gap.

Put on the skirt and adjust the gathers. Stitch down the sides of the elastic, connecting the side seams up to the top of the skirt. This will keep the elastic from sifting around.

Wash, enjoy, and wear!

8.02.2012

[completed] birthday blocks and rings

birthday presents!

Do you have any recollection of this baby quilt? No? Well, I made it almost exactly a year ago for the birth of Adam's cousin's baby. In a few short days, that baby will turn one year old! To celebrate, I sewed up some soft fabric baby blocks and rings for her. I followed (roughly) this tutorial for the rings, and this tutorial for the blocks. Not that you even really need a tutorial!

The fabrics are the leftover scraps from the quilt, so everything will be nice and coordinated!

fabric baby blocks and rings

8.01.2012

[tutorial] grow capsule animal mobile

Today I am going to show you how to make a quick, cute and inexpensive mobile!

1. Gather supplies!
You will need grow capsules (found at any major store in the toy section, and also often in the dollar sections), scissors, a hand needle, clear thread, and half an embroidery hoop (luckily I had a broken one just waiting to be used!)
supplies
2. "Grow" your capsules!

drop capsules in warm water
 3. Watch the animals (or whatever shapes you have) appear!
and watch them grow!
 4. Continue watching. It takes awhile.
there's a lion!
 5. Squeeze out the excess water and allow your spongy animals to dry.
let the sponge animals dry
6. Thread the needle with an arbitrary length of clear thread. 
7. Gently slide the needle through the center of the back of a randomly selected animal shape, so it will hang nicely. 
8. Tie the other end of the length of thread to the embroidery hoop with a double-knot.
9. Repeat for all the animals.

Sassy wants to eat my animals while I work 
 10. Tie three extra-long strings to the embroidery hoop equal distances apart. Tie a knot of the three strings together.

 Hang and enjoy!
completed mobile!


NB: Clear thread is slippery and difficult to see. For an easier equally cute alternative, use strands of colored embroidery floss!

6.06.2012

(sort of) completed: tinted mason jars


closeup

The summary:
The good news: it worked! 
The bad news: it dripped!
Inside method: Not so great!
Outside method: Much better!


Here are the results of my recent mason-tinting jar adventure. I made five jars total (sadly only four are pictured - I finished the fifth after these photos were taken). As you can see, I did two purple, one pink, and one orange. (The fifth is also orange).

I used Mainstays wide-mouth quart jars from Wal-Mart ($7.44 for 12!), and used the following mixture:

1/2 tablespoon water
1 spoonful (not an exact tablespoon) Mod Podge
3-5 drops of food coloring (for the pink I used three drops of red; for the purple I used three drops of red and two drops of blue; for the orange I used two drops of red and three drops of yellow)

And that's it!
I mixed in disposable bowls using disposable spoons. Bad for the environment, good for my drain.

see the drips? 


Inside-tinting: For the pink and one of the purple jars, I swirled the mixture around the inside, let the excess mixture drip back out, stuck them in a 200F oven for three minutes upside-down, and then left them in there right-side up for approximately 45 minutes in a vain attempt to get the drips to go away. This was not very successful. The jars are very drippy. For the orange jar, I let it drip out onto a paper bag for a few minutes before putting it into the oven right-side up. This was more successful, although still not perfect - as you can see, there is a distinct ring of orange gluey mixture around the bottom of the jar.

Outside-tinting: For one of the purple and the not-pictured (but perfect!) orange jar, I made the same mixture (I actually used the leftover from coating the insides of the other jars), and carefully painted it on the upside-down jars using a small sponge brush. This worked out pretty well, except that it is difficult to then move the jars into the oven. I would suggest painting them on a wax paper-covered cookie sheet and then transferring the whole thing into the oven. I left the purple one in the oven for almost a half-hour, and the not-pictured orange jar for almost an hour (by accident).

Conclusion: I much prefer the outside method, although it is not as fun to do. The outside method is also preferable because then the jars can be used to hold flowers, floating candles, and other watery things (but not for drinking! glue is bad for your health!) and the inside-tinting would not work so well for these purposes.

pretty but imperfect

Apparently, I can remove the tinting from the jars that did not turn out so well (coughallofthemcough) using soapy warm water. I will probably try this as well - although the jars are still pretty, they are not what I had hoped to achieve.

Edited to add: Warm water is all your need to remove the coloring. It peels off in big sticky sections. I found it easiest to warm up the glue coloring with warm water, let it stand for a few minutes, and then try to take it off. It's challenging to get the glue out of the inside of the jars - another reason to try the outside method.

I am going to experiment with using more food coloring to get darker colors, but I think I will be doing it all using the outside method from now on.

pretty shadows!

5.30.2012

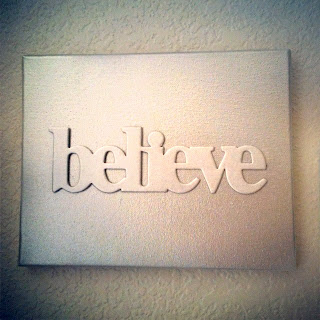
mini tutorial: 5min wall art


Materials:
1 8x10 canvas (available everywhere)
1 chipboard word (available at Michael's, usually in the dollar section)
1 can spray-paint (available in hardware stores)
1 glue gun (available everywhere)


Steps:
Glue chipboard word to canvas.
Spray-paint both the word and the canvas the desired color.
Let dry for a few hours.
Enjoy!

5.28.2012

framed butterflies

finished!
Today, while making more tile coasters, I decided I wanted to use the scraps of paper for something pretty. I'd seen lots of these framed butterflies floating around the internet, so I tried my hand at it.

Materials:
1 8x10 frame, spray-painted white
1 8x10 piece of cardboard, spray-painted white
1 Martha Stewart butterfly punch
Fine-tip applicator glue
Lots of scraps of paper (I used a Premium Stacks safari stack)

Total cost: <$15.00

Steps:
Spray paint the frame and piece of cardboard. Allow to dry. Punch out about a bazillion (or 54) butterflies. Glue the back of the butterflies' spines (which are very narrow, which is why you want glue with a fine-tip), so that the wings can be free. Arrange six across and nine down in a pleasing pattern (or wing it like I did (ahaha, get it? wing it? no? okay)). 
Easy peasy and so cute! I left the glass out, so that the wings stand out and give the butterflies a 3D effect.


closeup!


tutorial: words on a poster

finished!
 This will be a quick tutorial because the steps are very similar to my tutorial for messages on a canvas

Materials:
1 16x20 poster
1 set of 2inch vinyl letters (available in the hardware section)
1 can spray-paint in the color of your choice (be sure it is a color different enough from the colors in the poster that the words will stand out!)


Place the letters on the poster in the message of your choice. Use a ruler to make sure they are evenly distributed and straight. I placed my letters 3/8ths of an inch apart with a 1inch space between words. There is also a 1.5inch space at the top and bottom of the poster, and 2inches between lines of words.


Spray-paint the poster with the color of your choice. Let dry.


Peel off the letters, and frame to enjoy!