Showing posts with label sewing. Show all posts

9.29.2013

[completed] aragon bag, take two

front
So I decided to make another Aragon bag. I am smitten with this pattern, although I have to admit that it is not the easiest to create! I just love the finished result - the bag has structure but is still pliable, the shape is fabulous, and the creative possibilities involving fabric, color, and pocket options are great.

This one is my homage to Betsy Johnson. I mixed two similar red and pink and black floral prints with brass hardware. I used one print for the main body and exterior pockets and combined it with the busier floral print for the exterior snap pocket, straps, and lining. For this bag, I experimented with using gold rings in the straps. I love that extra touch!

side
I also used a bright red as my accent color for the interior of the pockets. I love that little pop of extra color with the prints and the brass zippers.
back
 The back of the bag again features a long zippered pocket. Here you can see the red around the zipper. Love it!

lining
 The lining is the same floral print as the exterior pocket. The inside of the bag features a zippered pocket, a label of mine, and two gathered pockets for phones, pens, etc. All the raw edges of the bag are trimmed with bright green bias tape for an extra fun pop of color.

it stands without support!
I added more interfacing to this version of the bag than I did with my first, and the result is much better. Although my first bag stood on it's own, this bag stands taller and feels more structured. The finished bag is 16 inches wide and 10 inches tall with 13 inch straps. Perfectly sized for carrying, well, anything!

Once again, I love this pattern and the resulting creations, and you'll definitely be seeing more Aragon bags in the future!

9.24.2013

[completed] aragon bag and pattern review

While pinterest-ing the other day, I found a new Sew Sweetness bag pattern, the Aragon Bag. I knew instantly that I had to make one. So I did!

finished aragon bag

Although I've admired several of the Sew Sweetness bag patterns, I've never taken the plunge to buy one. But for $9.00, this pattern was mine! I went to Jo-Ann's to get all the necessary materials, and found this great gray cross-hatch fabric. I combined it with a fabulous colorful peacock print on gray (for the lining and the straps) and used hot pink as an accent color. 

side view

I splurged on metal zippers, since they look so much better than plastic zippers and seem more durable. There is a 22inch zipper for the top of the bag, and a 14inch zipper for the zippered pocket on the back. The bag also has gathered pockets on the sides for stashing small-ish items. There was also supposed to be a zippered pocket and gathered pocket inside the bag, but I ran out of fabric. 

the back
The front of the back has a nicely sized pocket with a magnetic snap (my first time installing a snap!). 

the front snap pcoket

Overall, the pattern was easy to follow. I had no trouble figuring out what to do, just how to do it. But there were a multitude of helpful photographs of the tricker steps. My only complaint about the pattern is that I didn't end up with enough fabric for all the pattern pieces. I'm not sure if I cut wrong (there is no cutting diagram) or what, but I would definitely buy extra fabric next time. That aside, I love the end result, and I am so pleased!


8.18.2013

[wip] one block down... 15 to go

completed 20x20" block
This is my first completed block for my sister's white quilt. I'm loving how this block turned out. The white-on-white fabrics stand out from each other, and the cream background fabric (Kona Bone) allows the white fabrics to pop. I chose Kona Bone rather than Kona White or Snow because I wanted to ensure that the white piecing (and all the work I did!) is discernible from the background fabric.

I completed this block yesterday, and then prepped a few others. It seems to be faster to do a bit of an assembly-line type production rather than see each block through from start to finish. 

The block turned out smaller than the pattern says it should - oops? I'm not sure how that happened, because the block is evenly 20x20", but as long as my blocks are all consistent, it shouldn't really matter.

I'm super excited about this project. I think it is turning out to be a lovely low-volume quilt, which is all the rage right now. 

Once again, I'm using Cluck Cluck Sew's Wallflowers pattern.

[life] sewing room as it really is

Recently I showed you where I sew. Now I'm going to show you where I sew while I'm actually sewing.


It's a bit messier, as you can see. I have a pile of partly-used fat quarters on the floor (because where else can I store fabric flat?). My laptop is set up on the color-wheel dresser so I can "watch" (aka, just listen to) movies while I sew. The pieces of my current project are all set up nicely within reach. My cutting board is also set up on the desk so I can easily sew and cut without needing to leave the room.


My ironing board is also set up so that I can press quickly - the iron is almost always on while I'm in the midst of a project. You can see my faithful (ha. ha.) companion Sassalass under the ironing board. (She's almost never present when I sew, preferring to wait until I finish a project and then lay all over it. Gandalf, on the other hand, is fascinated by the process and tries to live inside the Enterprise's throat and bat at the needle). You can also see the pink scrap basket ready to store any scraps I acquire while sewing and cutting. On the wall, hanging from my curtain rod, is a completed block for my current project so I have inspiration/proof of progress on the wall.


Here you can see where things get messy. There is (another) scrap basket overflowing next to the black dresser, and a pile of recently purchased fabric waiting to be folded and put away under the window. The top of the black dresser is covered in random things. It's just so easy to put things there...


And, of course, Enterprise is all set up and ready to go. The thread catchall that I made last night sits next to Enterprise so that I can easily put snipped threads in there and (hopefully) avoid getting bits of thread all over the room (and myself). And, you might notice, the thread ripper is front and center, ready for use. I hate ripping out stitches, and unfortunately, I have to do it more than I'd like. Hence the easily-accessed thread ripper. (I used to have a prettier, ergonomic one, but Sassy chewed it up, so I just have this basic blue one now).

And that's what my sewing room normally looks like! This is where the sewing magic happens.

8.17.2013

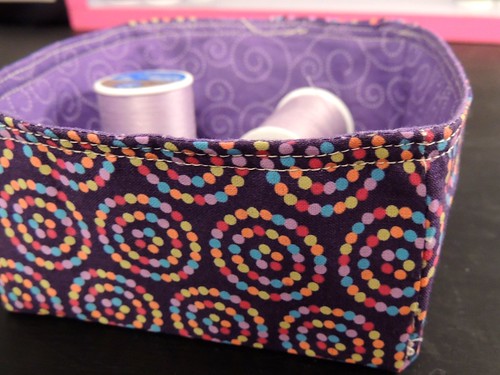
[completed] thread catchall

Untitled by craftthepainaway


I just completed a mini thread basket/bin/catchall! I followed a tutorial by The Sometimes Crafter. For this catchall I shrank the proportions a bit - I made the starting block 10x10" (rather than 15x15)" and cut out 2.5"corner squares rather than the suggested 4.5". (I actually made another basket following the exact instructions, but it turned out bigger (and not as well constructed) than I wanted.

This basket will be used to collect all those random bits of thread that always seem to magically appear during a sewing project. (Even though Enterprise has a marvelous thread cutting feature, little scraps of thread seem to be everywhere in my life).

8.10.2013

[100 day city sampler quilt challenge] day twenty, block nine

block nine
I actually finished this block two days ago. Turns out I'm not very good at updating my blog sometimes.

This block was quick and fun to assemble, and a great way to show off fabrics.

8.08.2013

[life] where I sew

Today I thought I would share some photos of my relatively recently painted and decorated sewing room! It's not a terribly large room, but it features two big windows and enough room for my 6 foot long desk, my colorwheel dresser, my thread holder, a bookcase, a black dresser I bought for a mere $80, my new extra-large ironing board (thanks to my mother!) and more lamps than any room could possibly really need.

See?

view from the doorway
I set my desk against the window so I could look out while sewing, and have natural light illuminate my sewing machine.

my awesome desk and my dear Enterprise
I recently discovered (thanks to Adam) that most of my 24x36" cutting board fits on my desk. That means I can cut small pieces of fabric, iron, and sew all in the same room! I hung the Sassy silhouettes on either side of the window. ('m going to need to make some of Gandalf. Although he is not so fluffy, so the silhouettes will likely be uninteresting.)

ironing board and quilt display
Recently, Adam helped me to install a 84" curtain rod on the wall, which allows me to hang quilt for photographing and display purposes. The ironing board was a housewarming gift from my mother, and I love it! The fabulous green iron was a present from Adam. The fabrics on the ironing board all belong to my 100 days city sampler quilt challenge. The little pink fabric box holds scraps, and my awesome yellow mesh trash can holds, well, trash.

curtain rod + clips = quilt display
Adam suggested I hang his anniversary quilt because (and I quote) "I like it". Well good! I like it too! 
The clips are actually designed to hold curtains, but they work well for holding quilts as well.

my colorwheel dresser, thread organizer, and artwork
The bookcase (which I've had for approximately forever!) holds my quilting and sewing books and magazines, with photos of my family and a big silver "E". The colorwheel dresser holds (almost) all my fabric, and my wonky-but-awesome thread holder obviously holds all my thread. The artwork on the walls is a combination of photographs of me and Adam, completed cross-stitch projects, Etsy art, a quote an old au pair wrote out, a Swedish quote about life that my mother game me, and a embroidered skeleton on shirt that my dear friend Erin stitched for me years ago and I recently stretched over a canvas for display.

closet, my burlap lampshade, and the door
The closet holds lots of excess fabric, supplies, and works-in-progress. The black dresser holds general craft supplies. My burlap lamp sits next to the "wish" sign and silver fairy statue from my wedding, and the artwork on the wall are photographs from my wedding with a poem my mother wrote about my wedding veil. And then, of course, there is the door. (One day I will paint all the doors white...)

And that's my sewing room! I love it.

8.04.2013

giant mistake

see the mistake?
Over the past few weeks, I've been working on a quilt for Adam's cousin's daughter's second birthday. Today I finished piecing the last row, ironed it, and starting trimming... and then realized I'd made a giant, irreparable mistake.
Oops.
I guess little Kinley won't be getting a quilt on-time for her birthday. I plan to remake this chevron quilt and donate this not-so-perfect version.
Sigh.
And just look how nicely all my points matched up...

[100 day city sampler quilt challenge] day fourteen, block seven

block seven
Clearly I have fallen behind. But I've been working on other crafty projects, which will be revealed soon, so I don't feel too bad about it.
Block seven was actually completed a few days ago. Adam chose the fabrics. I didn't follow the instructions in the book - at the suggestion of another blogger, I strip-pieced and then cut the checkboard pieces rather than sewing all the tiny squares together. This block was pretty easy to put together, and I am very pleased with how nicely all my points match up!

7.26.2013

[100 day city sampler quilt challenge] day five, block six

block six
Huzzah! Another block done! This one flew together while I FaceTimed with my sister, which was lovely. I love sewing while talking.

[100 day city sampler quilt challenge] day five, block five

block five
This one practically flew together and now I'm caught back up!

I'm not loving the orange fabric, but I wanted a softer color, so that seemed like the logical choice. I'm also trying to avoid repeating fabrics as much as possible so that the quilt is extra diverse.

I'm pretty excited overall. I love turning the page after finishing a block to see what's next for me. Hopefully you have the same fun seeing new posts pop up!

[100 day city sampler quilt challenge] day five, block four

block four
Still behind schedule... but at least I got a block done today!

If any day was a day to "craft the pain away", today is it. Now I'm off to work on more sewing to distract me from this monstrous headache.

7.25.2013

[100 day city sampler quilt challenge] day four block three

block three
I missed yesterday. I slept instead of sewing. Oops.
But today I primed our WIP kitchen island AND made a quilt block. This one was a bit finicky - I had to unpick a few seams in order to get all my corners to match up nicely. Adam chose the fabrics in it for me, and he said it looks like the sunrise. I agree - it's very bright and cheery!
Hopefully this weekend will hold lots of extra catch-up time for me to work on blocks!

7.23.2013

[100 day city sampler quilt challenge] day two, block two

block two
I have officially made up for not making a lost yesterday, and I am back on track by finishing block two just now. This block had a lot of pieces and like block one, all the pieces are tiny. You must remember, these blocks finish at just 6.5" with seam allowances, so they will end up being just 6" when finished. Craziness. I've never sewn with such tiny pieces, and it's a bit tricky. A ittybitty difference in seam allowance could make the whole block wonky. (As this block might be...)

The fabrics are prettier in person than in this photo. I apologize for the poor lighting in these pictures - most of my sewing time is in the evening, so the light isn't the best.

[100 day city sampler challenge] day two, block one

all my fabrics for this project
So obviously, my 100 day city sampler life quilt challenge got off to a bit of a rocky start, and I didn't make a block or post yesterday, which was day one.

Today I redeemed myself, and after photographing my pretty stack of fabrics a few more times, I cut into the blue fabrics to make block one!

block one
I'm pretty pleased with this block. It looks very pretty - Adam chose the four blue fabrics for the block and then I cut into them sort of at random, trying not to think too hard about which fabric would be for which pieces, if that makes any sense? I was a little paralyzed at the beginning, thinking I needed to make my block look like the one in the book. But, in the beginning of the book, the author Tula Pink says something along the lines of "I numbered these blocks so that you could have creative liberty and really make it your quilt". So I'm trying to take those words to heart and just do it.

Like Nike.

6.05.2013

[completed] piping

homemade piping
For a project I am working on for my sewing room, I needed to make some piping. Of course, I couldn't find any in a color that I liked, so I followed this piping tutorial and made my own! I cheated a little and used pre-made single fold bias tape. I bought cording, but it was way too wide and didn't fit inside the bias tape. So I bought some thin, inexpensive yarn, and made do. It was surprisingly easy and quick, and turned out well. Hopefully it will work for my project!

6.03.2013

yet another project

yet another project
Adam and I snagged this awesome and hideous (but very comfortable) glider chair at a yard sale for $10 this weekend. He promised me a glider ages ago, so I was very happy to find one we liked for such a great price. I like that it is white, but that fabric has to go. I plan to recover the chair cushions, but I have to decide on a fabric first! It's tricky because this chair is in the spare bedroom/future nursery, so I want it to be gender neutral for future children but also appropriate for a guest bedroom until we have a little person.

I plan to use a home decorator weight fabric for the chair cushions so that it will be durable. There are a lot of cute choices out there - I've been browsing fabric.com and have found a bunch of reasonably priced fabrics that I love. Especially this one. Is that wrong?

5.14.2013

[wip] giraffe shirt

cutting cute giraffe fabric
featuring a scented sachet as a pattern weight
Today, in between running errands and being super productive, I decided to make another top using the same pattern as my last one. When I learn something new, I like to practice those skills multiple times to solidify the knowledge in my mind. Practice makes... better memories?

Anyhow, isn't this giraffe fabric just the cutest? I'm pairing it with a matching turquoise solid for the yoke.

5.13.2013

[completed] first real piece of apparel

isn't it pretty?
On my last day of graduate classes (yay!), I stopped by Jo-Ann's. There happened to be a 50% off classes sale, and I signed up for a class to make Simplicity Pattern 6148. It's a two-part class, with the first two-hour session last Thursday and the second two-hour session this coming Thursday. Well, we spent the first session just cutting fabric (which is legitimately difficult when you are new to patterns). So I decided to try the pattern on my own. 

I bought some inexpensive, colorful fabric at Wal-Mart for a test shirt, and used the same pattern to cut out the pieces. Then I followed the somewhat confusing directions, and assembled the shirt without any issues. Isn't it pretty? I actually wore it the day I made it (Friday). Sorry there are no pictures of it on - I totally forgot that part. But I showed it to my sister on FaceTime, and she has requested that I make one for her now, so it must be cute.

I'm pretty pleased!
love those giant flowers

2.10.2013

[wip] superhero granny square quilt


Today I decided to turn some of my colorful scrap squares into something real. So I stitched together a piece of Spiderman and some red, yellow and black squares into a granny square block, following this tutorial.


This is the result!

This is my first time working with so many tiny pieces (the squares finish at a mere 2 inches). It's honestly a bit tedious, but I like the result. I haven't decided how many of these granny squares I'm going to make, but I have lots of scrap squares!